Job Site Planning for Residential and Commercial Paving
BY AsphaltPro Staff
Part Two of AsphaltPro’s “Best Practices for Residential and Commercial Paving” series. Read Part One here, and Part Three here.
At World of Asphalt 2019, Brian Hall presented a seminar of best practices for residential and commercial paving. Hall, a territory manager with LeeBoy, Lincolnton, North Carolina, visits up to a dozen paving jobs each week. On those jobs, he’s noticed the temptation to overlook underlying deficiencies—for example, with the binder course—as if they won’t impact the final product.
“It does matter,” Hall said. “If you have less than best practices even on the parts that don’t show, your surface will show that. When you stop worrying about the little things, the big things suffer.”
Here, we share some of the insight Hall presented in the second of a three-part series devoted to best paving practices for residential and commercial jobs. Our first segment of the series covered job descriptions on the paving crew. This article outlines the best practices of planning, and the final segment in the series will detail best paving practices on residential and commercial jobs.
“Quality paving starts with proper planning,” Hall said. And it starts from the moment you bid a job. “Estimators need to take everything into consideration.”
Particularly important with commercial and residential paving is making sure to notify residents or customers. “You don’t want to have to deal with or tow any cars the day you start paving,” Hall said.
He also recommends having a pre-job meeting before each shift to discuss the previous day’s successes and shortcomings and talk through the upcoming shift. Hall said this is a great opportunity to encourage workers to take ownership of each job. It’s also a good time to make sure each person knows their responsibilities.
Make sure everyone is wearing proper personal protective equipment (PPE). Each person should be wearing long pants, work boots, gloves, hard hats, safety vests and sunscreen, Hall said. And, of course, follow safety best practices, such as never walk between the haul truck and the paver and do not talk on a cell phone while operating any equipment.
“If you have to make a call, like to the plant or something, stop your machine,” Hall said. “Everyone’s ultimate goal has to be to bring home everyone you started the shift with.”
Your equipment should be in proper working order. All safety decals should be clean and visible. Hall offered a reminder that manufacturers sell replacement safety decals for their machines.
To keep your equipment in top shape, Hall recommends a daily maintenance routine, taking care to check all hydraulics, fuel, etc. “When you have asphalt arriving isn’t the time for surprises,” he added.
Planning the Project
Project specifications, asphalt tonnage, grade conditions and paving width are all key to planning your project effectively. Prepping the site and your equipment is also important.
Project Specifications
Of course, you will also need to know the project specifications. What type of job is it? Will you need to tack the surface? If so, what’s the rate? Will there be inspectors on the job? What compaction numbers are you looking for?
Asphalt Tonnage
The asphalt tonnage will influence the rate of paving, so it’s imperative to know the output of the asphalt plant and that they will be able to supply all the asphalt you will need. If not, make sure you have a plan B. You should also know the route from the plant to the job site, how long it takes to drive, and how many trucks you have. All of these factors dictate the speed of paving.
Ideally, there will always be a truck ready to load the paver. If ever the crew must stop paving, Hall recommends keeping the hopper 25 percent full. The top of the material will cool between loads, holding heat for what’s beneath it.
“That crust insulates everything underneath,” Hall said. “When the new load of asphalt comes, it will reheat that crust and everything will flow smoothly through the paver.” Having asphalt in the hopper also means you always have asphalt in front of the screed.
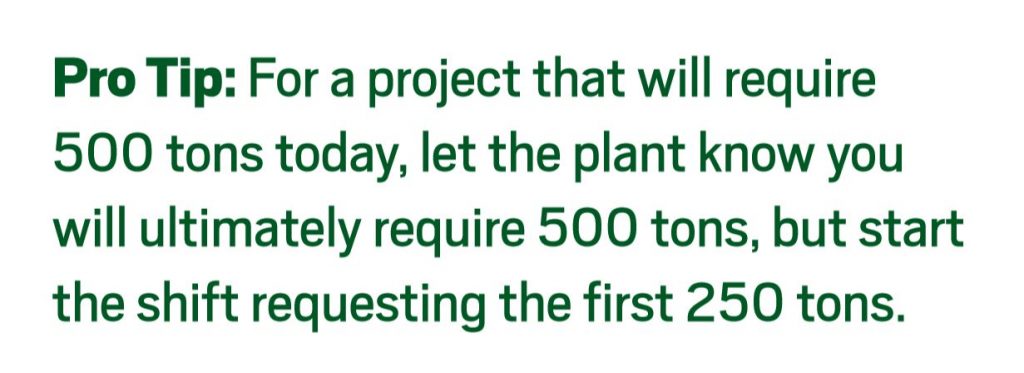
Hall also recommends ordering asphalt in tons, not in truck loads, since the plant will not know the tonnage of your trucks. If you have a 500-ton job, Hall recommends mentioning the total tonnage but only asking the plant for 250 tons. “Then, if things are going well, you can call the plant and ask for the other 250 tons,” Hall said. “Communication with the plant operator is the key.”
Communicate with the plant operator to make sure that the mix you’re using is right for the depth you’re paving, Hall said. A general rule is the depth should be three times the size of the smallest aggregate. If the aggregate is too big, the screed will drag over the larger aggregate, making a terrible noise and crushing it up.
Grade Conditions
“We’re not always dealing with a milled surface,” Hall said. “We may have to do a leveling course, there might be bumps, low spots, potholes or alligator cracks to deal with before paving.”
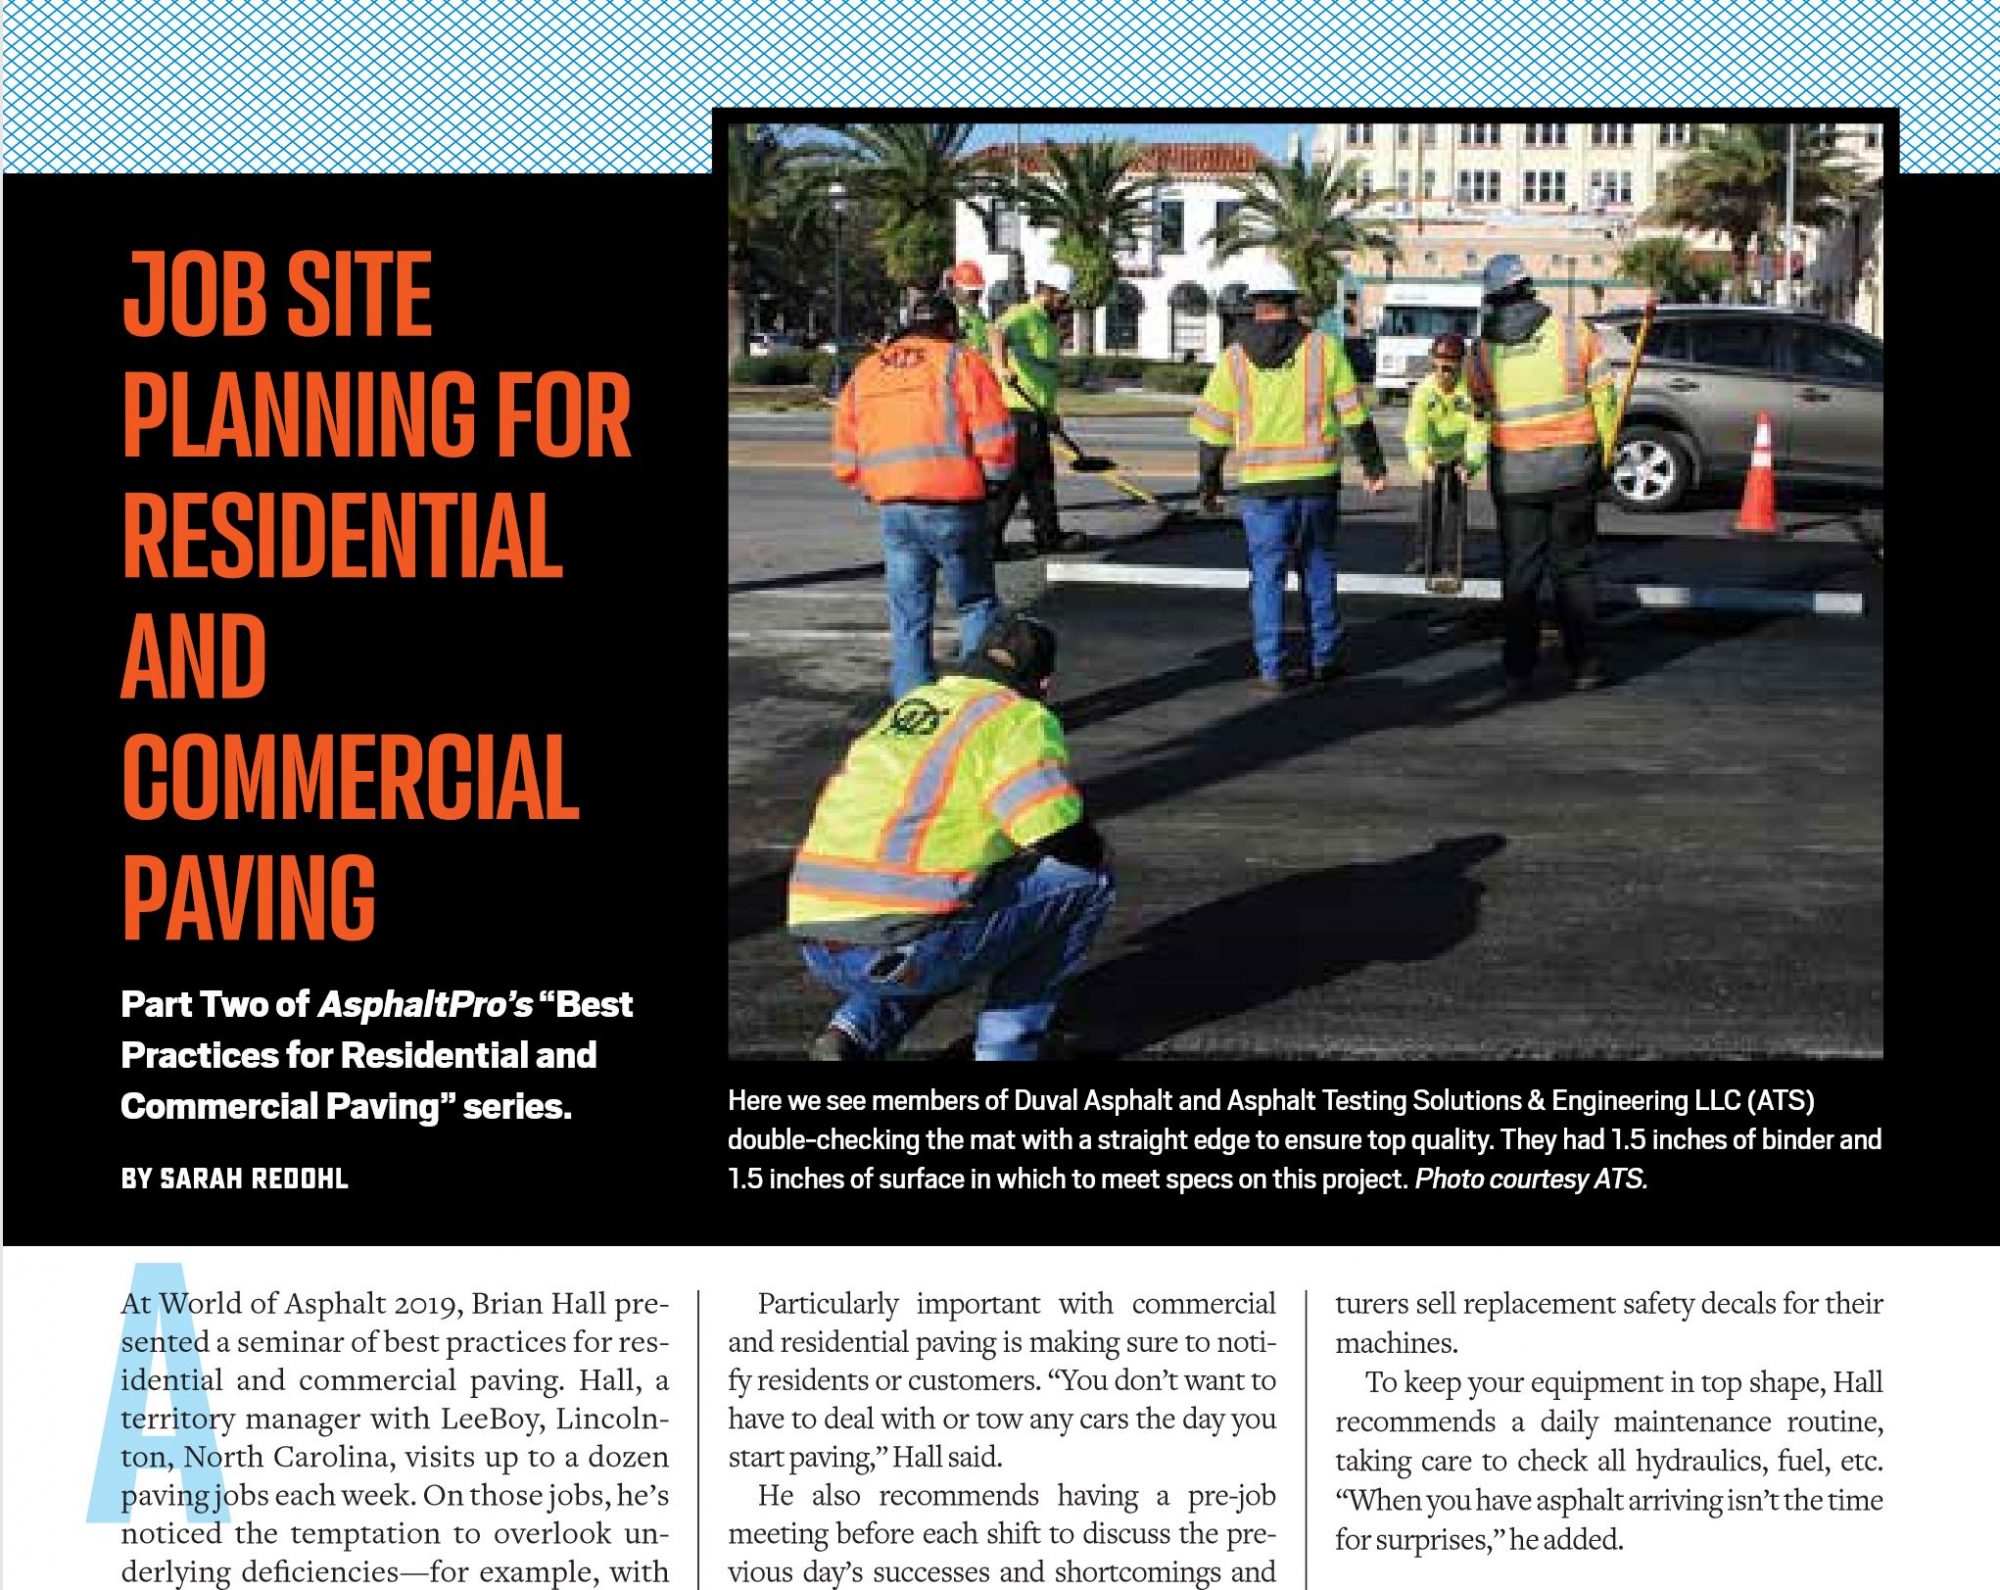
In the event of rutting, you should mill it down to grade to get a flat surface or pave a leveling course. Hall said, for the leveling course, simply put the screed down and feed asphalt through it until it fills the low spots. Of course, this doesn’t solve the underlying problem, but this gives your crew a flat surface to work on. “It’s not always easy to see a problem until it rains, so take a straight edge with you to see where those fixes need to be,” Hall said.
Paving Width
Knowing the size and layout of the job will help you determine how many passes, and at what width, to pave. “These aren’t just rectangle parking lots anymore,” Hall said.
Regardless of the variety of modern parking lots, with all their parking spot cutouts, trees, and other obstacles, some things remain consistent. You will pave with the fewest number of tie-ins. You will plan a route for trucks to come in and out so they can avoid driving over the fresh mat. You will plan ahead so you will pave your way out of the lot rather than get stuck in a corner. You will make it easy for your roller operator to stay busy, thus keeping the drums hot, without forcing him to track over tack or dirt. All of these things can easily be achieved if you have a plan.
Site Preparation
You should also prepare the site for your own success. Is it free of dust and debris? If not, your tack will not stick. Tack is an emulsion–asphalt mixed with water–and when the water evaporates, the asphalt will help the new asphalt stick to the old asphalt.
Hall said 95 percent of the surface must be tacked for the coat to be effective. “Otherwise you’re just throwing away money,” Hall said. Too little, and you risk seeing raveling and slippage. Too much, and you risk it bleeding through, which “doesn’t look good and takes your friction course away, so it’ll be very slick when it rains.” If tacking old, oxidized asphalt, Hall recommends 55/1000s of a gallon of tack per square yard (nearly 6 ounces).
Equipment Preparation
As time has gone on, Hall has seen more and more residential and commercial pavers with grade control equipment. Take time to set those controls up and to set up your string lines.
Since the screed is the money maker, Hall said, it’s key to set it up right. Zero out the electric screws or hydraulic screws. Set the end gates to meet the job requirements, spray the screed with ecologically friendly material before heating it up, and make sure the extension is in line with the main screed all the way out. Check that the angle of attack is consistent on both sides, that the crown is set to the correct value, and the tow point adjustment is at zero. This should take about 30 minutes to get set up.