Get Paving Basics Right for Top Quality Overall
BY John Ball
In last month’s issue, we discussed how to use a little extra mix to hold heat on the transverse joint and stretch the extensions for the last pull off of a widening job. Let’s use that same project to look at a top quality job overall when you have the specific limitation of a single lift to place.
Depending on the owner’s budget, you may be limited to one lift on a project. This means you have one chance to get a top quality pavement and no room for error. You want to start by assessing the subgrade and then lining out the job, paying careful attention to what you’ll encounter in the roadway. Then execute with efficiency and compact quickly.
Pave carefully near utility caps to protect paving equipment and to ensure the finished pavement will be sealed beautifully to keep water from getting down into the subbase. For the final lift—the surface course—you can pave over the utility cap. The laborers will clean off the disc itself.
Check the Subgrade
When performing a thinlay or a single lift of hot mix, one of the items to keep in mind is to make sure the subgrade is rock solid. The trucks coming to your job aren’t any lighter than they are when delivering mix to a highway project that calls for two or three layers. This means you want to be confident that your subgrade can support the trucks carrying 18 to 23 tons of mix.
If the haul truck’s tires sink even a quarter of an inch, the ruts they cause will create yield and compaction problems for your crew. A poor subgrade means potential cracking problems for your pavement’s future, too.
Checking the subgrade should be part of the estimating process so any changes to the work order are routed through the bean counter’s department. Make sure the foreman on the job—or the project manager—knows he can stop and question a weak subgrade before putting the job’s performance in jeopardy.
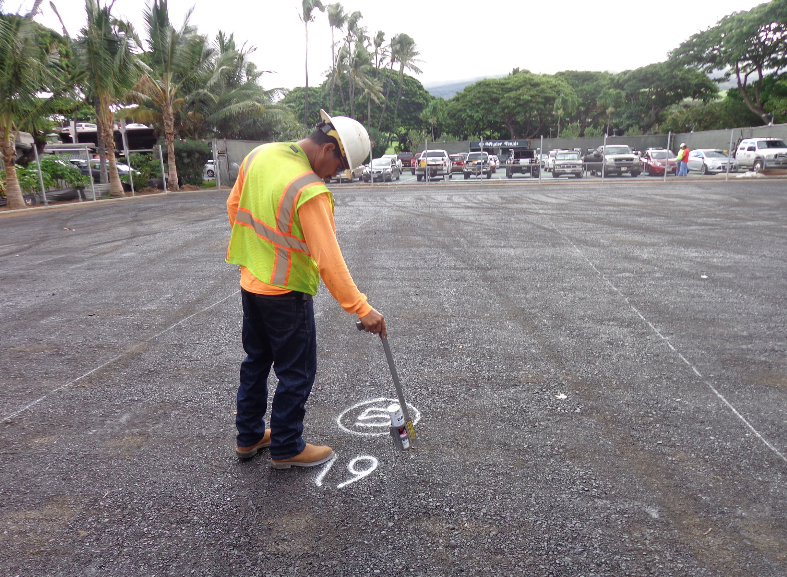
In addition to the pass number—in the circle—the crew member here paints the number of tons that will be used in that pass. In the event we run over, we will know immediately that something is wrong. If we don’t use the full 19 tons, again, we’ll know something is off and we can work to correct it.
Line out the Job
Before we put equipment on the area to be paved, we want to line out the job. We’ve devoted entire articles to the best way to do this, and you can find those articles at www.TheAsphaltPro.com. For this article, I want to remind workers that it’s important to figure out your paving plan ahead of time. Decide how many passes you need to make with the paver, which pass needs to be made first and which needs to be made last, and how many tons will be used in each pull. This information will get marked directly on the pavement before you begin.
When you have the lines drawn, go back through to mark which is Pass 1, Pass 2, and so on. Next to those numbers, paint the number of tons for the lane. If the project is complicated enough and you think the crew needs the extra notes, draw arrows to show in which direction the paver is to move. These marks are the roadmap for your crew to communicate more easily with one another once the project gets going. Use them in the manner that makes the most sense to you.
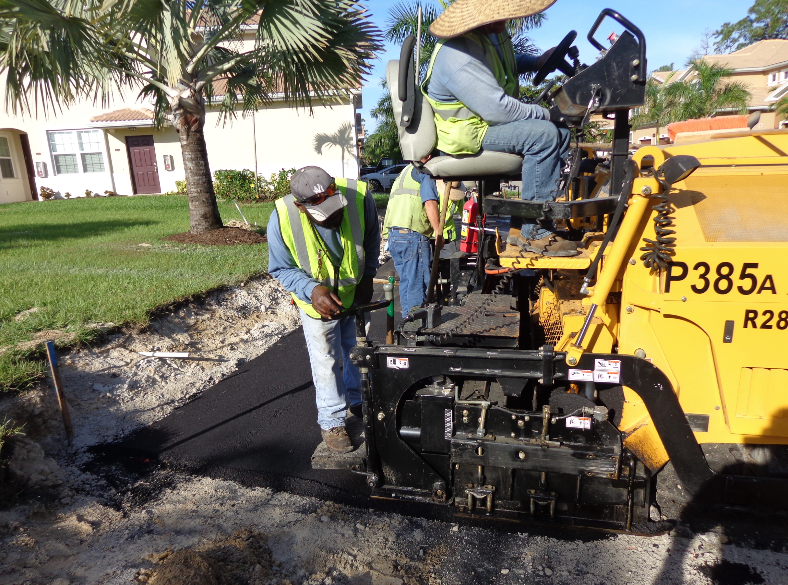
This crew in Southwest Florida demonstrates perfectly how to manipulate the material around the utility cap by hand—and by foot. The lute artist uses tamp shoes to get initial compaction immediately. The plate compactor you see in the background is making its way to the structure, but the lute artist has already begun the important job of sealing the joint between riser and mat.
Watch Your Encounters
When paving on city streets, you’re guaranteed to find utility covers and/or manhole covers in your path. A number of companies sell manhole risers in many diameters that you can place around the obstruction to make your job of paving around them a little easier. Do that effectively by checking the subbase when you get to the site and compacting the material as soon as it’s paved.
On residential road construction, the utilities are usually put in a day or so before you go in to pave. That means you have the water main or gas main shutoff sticking up in the middle of your roadway with gravel or packed dirt around it. You want to begin by strengthening that area to prevent cracking of your fine pavement in the future.
Strengthen the subbase with good soil compaction technique. Spread concrete at a depth of an inch or two in a 5- or 6-inch diameter around the structure, essentially sealing the soil and stabilizing it so it doesn’t move.
The manhole riser mentioned above goes around the cap like a sleeve and locks into place. Now you’re ready to line out your project so you work in the most efficient manner. For mill-and-fill projects especially, you want to mark very clearly where the manhole cover begins so the mill and paver operators can slow down and get around it. You can’t stress to your crew enough that paving directly over an exposed manhole cover will cause severe damage that will stop the job.
Make sure you don’t drive the paver over the manhole on the first lift—the binder course. Instead, you will have the paver operator lift the screed to auger out piles of material near the manhole, but it’s an act of “equipment homicide” to drag a paver over a manhole during the placement of the binder course. It will sound like you’ve hit a stone wall. It might bring you to a complete stop when you hit. Whether the equipment stops immediately or not, within two seconds, you’ll know you’ve destroyed your screed.
When the paver operator handles the lane properly by augering piles of material next to the manhole structure, the laborers will jump into action. This is where the rakers and lute artists really come through for you. They will work the material into a smooth mat alongside and against the utility structure while the paver operator goes about his job down the lane.
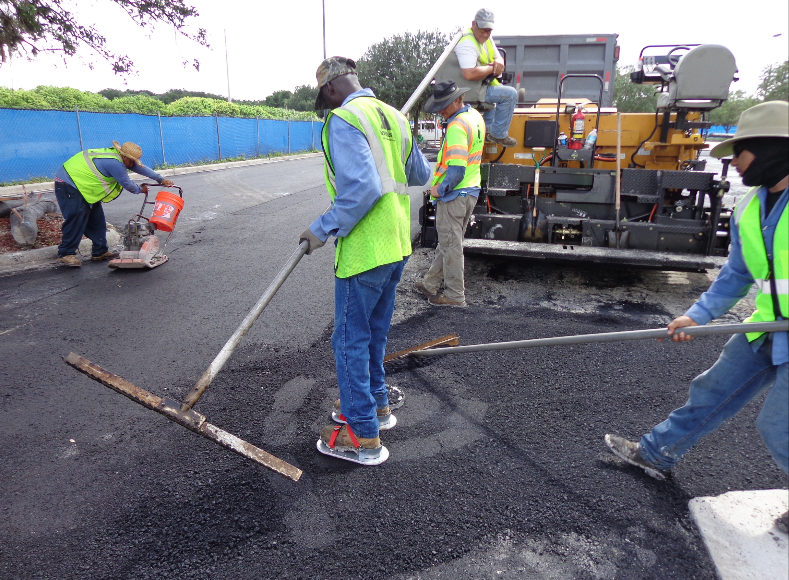
When the lute artist is almost done working the material into a smooth and clean mat against the utility structure, it’s time to get compaction started. Don’t wait on the roller. A worker with tamp shoes and a plate compactor needs to pinch and push the material gently and firmly into place, getting initial compaction right away. It’s vital to seal the mix against the riser and compact the aggregate into place to prevent cracks and water permeability at this structure in the future.
When the roller comes through, carefully compacting near the structure, it will be able to complete densification with less effort, yet still finishing off a top quality pavement for the city.
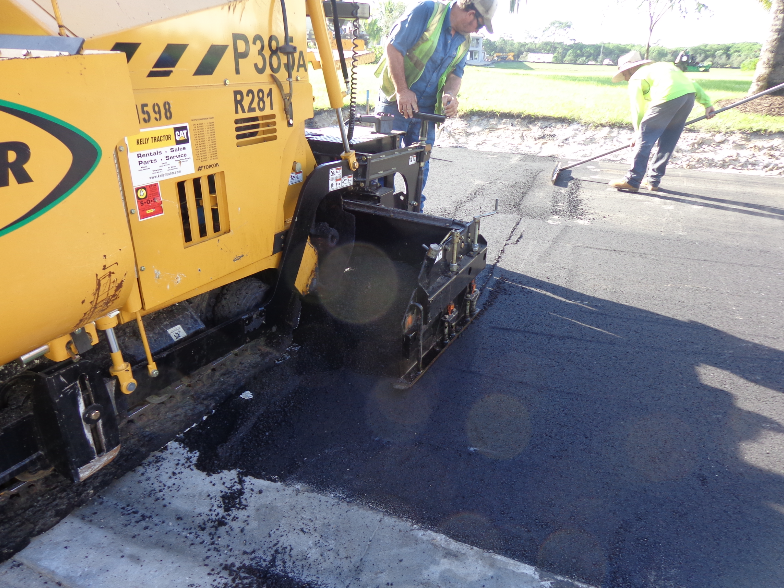
The paver operator sets the screed down on the table, then pulls forward about an inch and a half to tighten the tow arms prior to beginning the pass.
Take Off With Stability
When getting ready to start the lane, you’ll want a strong and secure starting point. You’ve assessed the subgrade and lined out the job. You’ve marked the obstructions clearly, so you’re ready to build your starting point.
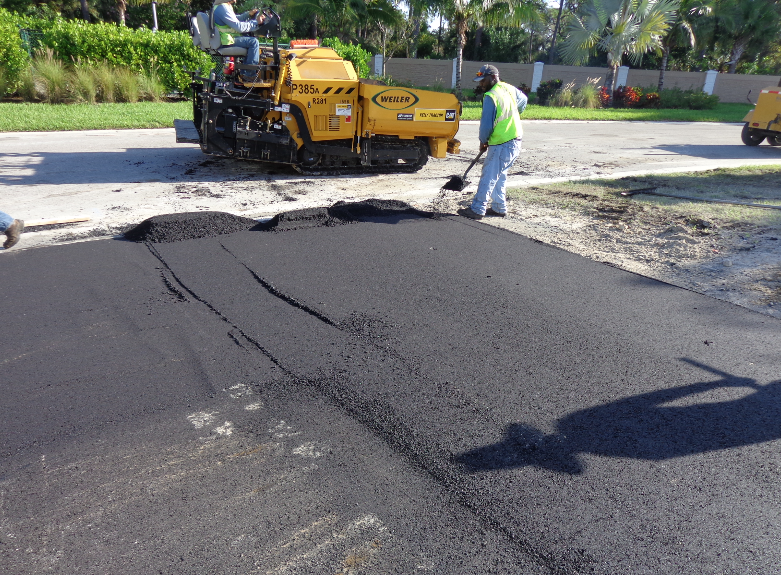
Back the paver to the corner or “starting line” of the first pull. With the screed up, run the augers to pile some mix back there. You want to get a good mound that will allow the laborers to build a 4-foot long “table” that your screed will rest on. This pavement will be a little wider than the screed—with extensions, if required for the lane—and at least 4 feet long so it can fully accommodate the screed plate when the crew is ready to pave. Depending on which OEM’s screed you have, you’ll need varying surfaces so the screed is flat for takeoff, so make it a general rule to create a 4-foot long table for consistent practice.
Once the laborers have smoothed this table, no compaction is necessary if this is the first pull of the project. You want the fluff factor in there. If you’re matching an already-exising lane, then the roller operator will compact the table with a plate compactor or walk-behind roller. Now the paver operator will bring the paver back into position and set the screed down on this pavement; then he pulls ahead about an inch and a half to tighten up the tow arms.
In this image, you can see the extension going over the pile, and you can tell it’s straining. You want to stretch the extensions a bit and give them some extra material to fill the joint very well, but this image shows what a larger pile can do to the screed and extension.
Heat, Match Joints for Widenings
As a quick reminder for getting smooth pavement all the way to the end of the project, pay close attention to the end of each pull. When the paver gets just past the end of the first pull, the operator can lift the screed and let the augers run out a little bit of mix in a pile. You want this for two important reasons. First, this material is hot and it will help hold the heat on the mat right there at the “joint” that you want to blend in. Second, the extra bit of material here allows you to stretch your extensions when making the last pass off the project.
When the paver gets to the end of the second pull, the operator can run out a little bit of mix again.
Keep in mind, you want each pile to be small—about half a wheel barrow full in measure. If the pile is too big, you’ll cause the extension to rise as you pave over the area. That will create a dip in the mat at the joint where water can collect when it rains.
If your crew gets overzealous with the pile at the end of the pass, you can get the laborer in there to shovel some of the material into a wheel barrow or into the skid steer bucket. This gets it out of the way and resolves the problem.
If the crew doesn’t notice the pile is too big before they pave over it, and a dip in the mat appears, get the shovels out and throw some material directly on the area ASAP. It’s important to get at the problem quickly because the single lift will cool quickly. Let the lute artist work the material in, getting the larger stone and fines to mash in together, and let the roller operator smooth it in place with the plate compactor.
The pile you auger onto the end of the pull does not need to be big to be effective. Keep it small and simple, but don’t stress out if you drop too much material. Just be sure the laborers are quick about the fix.
When a flat plate tilts to rise up over a pile of mix, part of the plate will gouge the mat while part of the plate will be overfed. This results in a dip in the mat that the crew will need to correct ASAP. The quality-minded crew can do that with ease if you’ve prepared them ahead of time for single-lift paving.
Efficiency is Key
In single-lift paving, moving quickly is the name of the game. There’s no time to dawdle after the paver places material. It will cool quickly, so you want to compact it quickly. That means if you see a low spot or a hole, you want to fill it right away and work the material quickly. Get a plate compactor onto it while the roller catches up.
It’s a little more challenging to get a top quality pavement when you’re limited to a single lift, but it’s not impossible. Make sure you follow the steps suggested here so you have a good game plan in place and good techniques at the ready. With a single, thin lift, everything has to be perfect. With a quality-minded crew, everything can be perfect.
John Ball is the proprietor of Top Quality Paving and Training, Manchester, New Hampshire. He provides personal, on-site paving consulting services around the United States and into Canada. For more information, contact him at (603) 493-1458 or tqpaving@yahoo.com.