
How to Mill to Get Compaction, Full Pay
BY John Ball
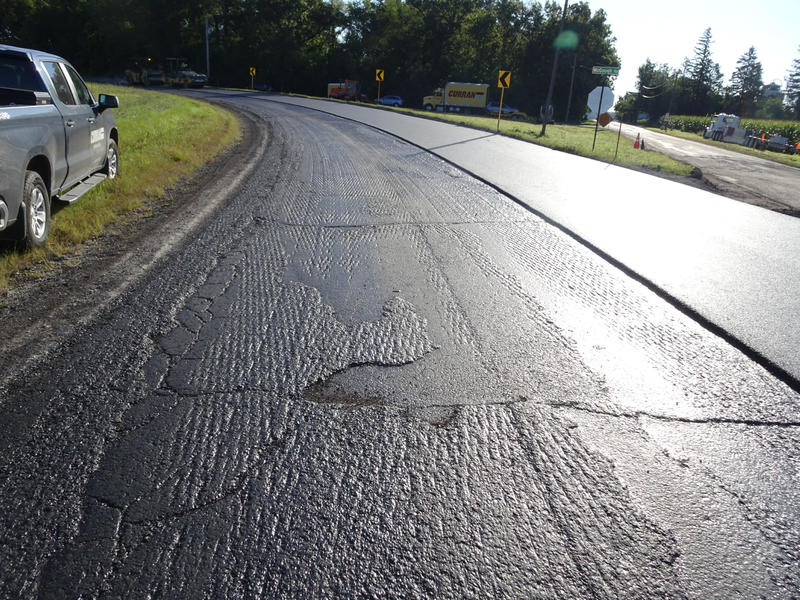
Pass deducts to the milling crew when they don’t prepare a true surface
In today’s pavement maintenance environment, I think we should charge costly overruns to the milling subcontractor when the milling crew leaves the paving crew with a mess to pave over and get density on. Let me explain why.
If you are on the cold planer, you have an important responsibility that can make or break the whole project. You are creating a new surface that the crew will pave a specific number of square yards on. If you’ve milled incorrectly or created gouges, high spots, delamination and other problems for the paver to correct, you’ve made it hard to get smoothness and yield. The material overrun and potential deducts from the owner/agency aren’t the paving crew’s fault; they’re your fault for failing to get grade, slope and a true surface for paving and compaction.
Here are some tips for milling a surface that makes smoothness and full pay possible.
In the 2023 article “Maximize Milling with These Best Practices,” with Wirtgen’s Tom Chastain, The Asphalt Pro talked about company and crew communication, getting the right size of machine on the project, operating in the right pattern mode for the job, using the right drum for the material you’re milling, learning how your grade technology works and how to set it, knowing how different tooth/pick options affect the material you’re working with, starting/stopping, safety, and the all-important speed.
Quick Tip: Don’t try to use a micro mill drum on recycled asphalt pavement. If you do, 10-12% of the material will be turned into dust when you hit it with 1,100 teeth.
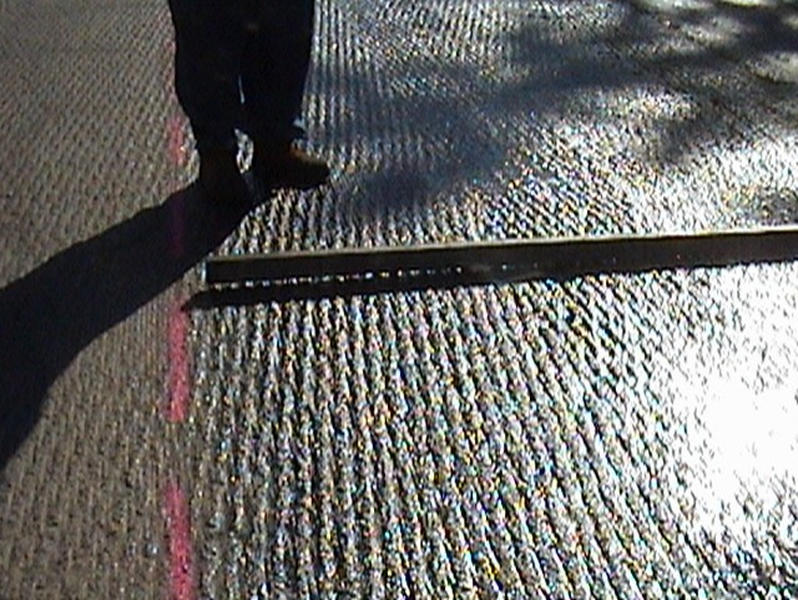
Every milling crew should have a straight edge and should be taking the time to double-check their work. If you’re seeing gaps under the edge where the surface should be flat, something needs to be corrected. In this picture, the light under the straight edge shows where too much depth has been removed along the centerline of the pavement. If there was going to be a crown in this road, the high spot would be along the red center line, where the worker’s feet are. Instead, we can see that the two 6-foot passes with the mill were cutting for depth, but the crew didn’t check to ensure the passes matched up.
Faster Isn’t Better
Let’s start here by talking about speed. You cannot mill 100 feet per minute (fpm) and expect to be smooth. The cutter drum will skip down the lane when you’re going too fast. Instead of milling the product, it gouges, tears and rips, making the cut irritated. In the picture above, you can see delamination left behind by a milling crew that was subcontracted for a road in Illinois. The skipping of the drum caused this.
Instead, the crew should have gone at 60 fpm. You’ll see “60 fpm” listed as an average speed for milling, and you’ll want to set your sweet spot based on many variables, such as:
- the type and size of drum you’re using
- the depth you’re required to mill
- the type/hardness of material you’re milling
- the condition of the subgrade
- the type of project
- and other considerations.
Depth Settings
Another best practice is to keep an eye on your depth, whether you’re running manually or using grade and slope with the ski. When you mill, you’re profiling the pavement. For the example in the top picture, the mill needed to remove 2 inches so our crew could lay 2 inches of asphalt down on top of it. The mill was taking out 2 inches on the left and acquiring 2% slope on the right. (Caution: On the slope side, you may not get 2 inches; it depends on the subgrade.) They made two passes to accomplish the full lane—one lane was grade and one lane was grade plus slope.
Remember, the goal is smoothness. On the left side of the picture where we see the shoulder of the road crumbling, that’s where the subgrade has given way. The road has broken off because removing 2 inches was removing too much. The mill operator should have come up a quarter of an inch, and he wouldn’t have left this problem for our paving crew to solve. If he’d come up a quarter or half an inch, we would have a truer surface for our crew to pave on.
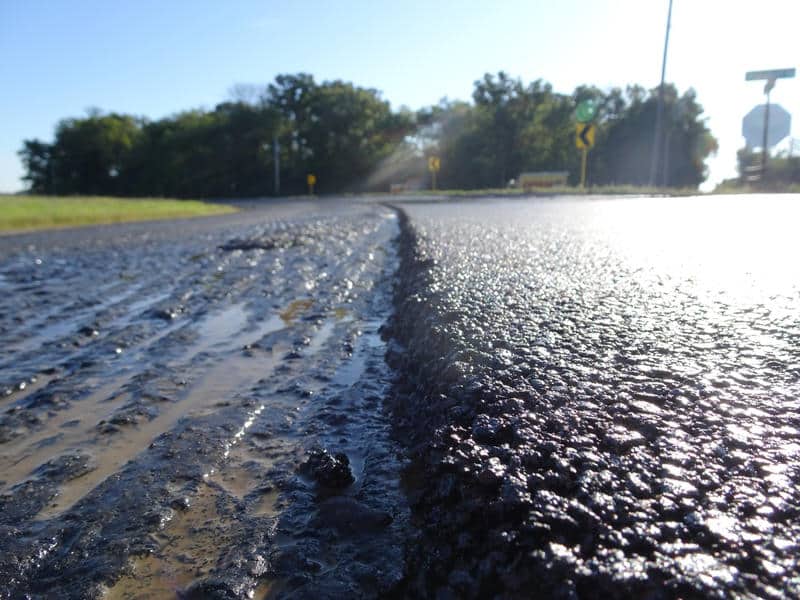
Tack collects in the gouges of a poorly milled surface.
Milling for the Screed
If you have a 12-foot lane to mill 2 inches deep, the first 6-foot pass you mill is along the joint so that you can establish your depth and grade. The next 6-foot pass includes the soft shoulder; why not take out 1.5 inches instead of 2, and leave a truer surface? The milling guys have got to take another look at what they’re doing and how they do it. This is where a straight edge is vital for QC/QA.
With the soft subgrade giving way in the top example, the surface isn’t uniform for the paver. This causes a rise in the road, where the screed will drag. Depending on the nominal maximum aggregate size in the mix, you could be setting the roller operators up to fracture the material in the middle of the mat.
Haul Millings Correctly
Most mill-and-fill projects will see the haul truck receive millings, drive those millings to the plant, dump them at a designated area, load with mix for the job, and return to the job to charge the hopper. There are some additional steps the haul truck driver needs to take to ensure the milling fines (the number 200s) don’t contaminate subsequent loads and mar the mat.
Here’s the problem: Not all truck drivers take the time to clean out the bed after dumping the millings. This leaves stray millings and dust from the fines melted to the truck bed, which was still hot from unloading HMA. When he drives under the silo gates, new HMA loads on top of cooled chunks and fines. When he delivers mix to the paver, those 200s look like dust on top of the new mat we’re paving.
Here’s the solution: When the truck drivers get to the plant, have a designated wash-out area and release agent spray station before the loadout scales. For a project in Alabama, we introduced a backhoe to scrape out the bed, ensuring the melted fines and millings were all cleaned out before the truck went under the release agent spray station. It’s just not feasible to let a truck sit at a cleanout area on the side of the road, cooling for 30 minutes before getting in front of a milling machine, so the next best thing is to engineer quality control at the plant.
Get Paid
The milling crew gets paid by the square yard. They think they can get more money by going faster and getting more square yards done. They beat the estimate by going fast, then they’re off to the next job. Because of the way they ripped and tore and delaminated the pavement, they left the paving crew without a true surface. This type of poor milling job ends up costing the paving crew in material overruns and poor density results across the mat.
When the smoothness numbers come back as unsatisfactory because the depth is irregular, the deducts get billed to the paving contractor. But it’s time those deducts get charged back to the milling company for not leaving a true surface. If he has to, the paving contractor should run a profilograph on the milled surface to prove how bad it is. By sharing the cost of deducts and penalties among the guilty parties, we should be able to increase the care and attention of the workmanship we want to see in the milling subcontractors out there.
I’ve not seen anyone challenging the milling subcontractors to adhere to best practices. But we need all milling companies to care. We need them to take the time to do a better job of providing a true surface for paving. Milling subcontractors need to follow best practices, not only to prevent material overruns and embarrassing deducts from inspectors, but also to provide the end user with a top quality pavement that lasts.
John Ball is the proprietor of Top Quality Paving & Training, Manchester, New Hampshire. For more information, contact him at (603) 493-1458 or tqpaving@yahoo.com.