Risk-based Quality Management System (QMS) for Construction Materials Testing Laboratories

Good business leaders understand that higher quality generally equates to lower overall risk to the company—lower risk for defective products, associated lawsuits, and the resulting loss of reputation and sales. Let’s look at building a risk-based quality management system (QMS) in your testing lab to meet or exceed a variety of accrediting agency standards, such as the American Association of State Highway and Transportation Officials (AASHTO), ASTM International (ASTM) and International Organization for Standardization/International Electrotechnical Commission (ISO/IEC).

QMS is Required

Construction materials testing (CMT) labs that provide testing services on publicly funded projects are required to have an approved QMS to meet the quality requirements of AASHTO R18, ASTM D3666, ASTM C1077, ASTM D3740, ASTM C1093 or ASTM E329. This requirement is typically contract or specification driven and will depend on the scope of work for the project. While most CMT labs pursue these standards as a framework for developing their QMS, many go above and beyond.

Many labs follow a more robust outline to deploy their QMS to showcase their lab competence and uphold higher standards. Many quality experts consider the ISO/IEC 17025 standard “General Requirements for the Competence of Testing and Calibration Laboratories” one of the most reliable standards for developing a QMS.

Deploying a risk-based QMS that conforms with AASHTO, ASTM, and ISO/IEC quality standards is a rigorous task.

When a QMS is developed to meet regulatory requirements or exceed minimum expectations, lab managers often need help to define the scope and extent of policies, procedures, processes, etc. Their challenge is exacerbated by the industry’s continuing evolution and lessening room for error. QMS is always a work in progress.

RMAEC Offers Certification for Process Control/Owners’ Acceptance Testing

Consider Risk

Risks, and their associated tolerance, are critical components for any lab operation, but they’re hard to identify. Some are harder to quantify. When risks creep into a QMS, they weaken the system, making it unreliable and prone to manipulation. At the very least, a risk assessment should include risk probability, severity and existing mitigation techniques.

The current version of the ISO/IEC 17025 standard, released in 2017, applies risk-based thinking to developing a QMS. It doesn’t provide any prescriptive solutions to manage risks. Instead, the standard requires the lab to perform a risk assessment and develop a management plan based on the risk’s influence on performance.

The standard gives sufficient discretion to lab managers to assess and manage the risks as they see appropriate. We’ll examine two sections of the ISO/IEC 17025 standard from the risk assessment and management perspective as it applies to CMT labs to demonstrate the risk-based approach to developing a QMS framework. The risk severity and probability for any given section in the ISO/IEC 17025 document will likely differ for different labs; Therefore, consider how the risk assessment and management plan discussed in this article could meet your organization’s needs.

Section 4.1: Impartiality. Risks from perceived bias have always been around, but with the current ISO/IEC 17025 standard, they need to be addressed by assessing and suitably managing them. These risks can range from innocuous to detrimental to any lab’s operation. For example, a personal relationship between a lab staff member and a customer can cause any reasonable person to question the impartiality of the lab finding. If management considers an issue like this harmful to its business, it is in the lab’s interest to establish policy guardrails to curb such problems. To manage the risk described above, the lab can have a policy that says if the customer and a lab member have a personal relationship, that lab member shall work on the customer’s project under the direct supervision of another lab personnel.

Section 8.7: Corrective action. Nonconformities are inevitable in any lab testing operation. But not all nonconformities rise to the level of requiring a risk-based corrective action. Some are isolated incidents that require a one-time corrective action. If the issues start recurring and become severe, there may be a good case for planning to manage that risk. However, it’s challenging for labs to assess the reason(s) for nonconformities and implement timely and effective corrective action. Let’s look at an example. A lab technician repeatedly failing to follow correct sampling procedures certainly could rise to the level of risk assessment. Managing this risk may include, among other things, retraining the technician to perform their task per the relevant standard methods.

Bluegrass Testing Laboratory Focuses on Asphalt Mix Designs, Binder and Aggregate Testing

PDCA

The lab should always consider the severity and probability of risks when planning the scope and extent of how to manage them. When planning risk management steps, a good formula is to use the PDCA rule: plan, do, check and act. To elaborate, plan what you will do when there is a risk, do what you planned, check if you accomplished what you wanted, and act on the gap between the plan and accomplishment. The other big part of resolving any issue is to keep all parties in the loop if needed. This will go a long way toward resolving problems and gaining stakeholder credibility.

A QMS is like a musical ensemble, if you will. In a musical ensemble, a group of well-rehearsed musicians plays a piece together in accord. It rarely happens that a change made somewhere or a lack of harmony among musical notes goes unnoticed in the final production. Like a musical ensemble, all it takes is one element of the QMS not to meet its quality objective, potentially reducing its overall effectiveness. Therefore, the lab staff should ensure that all aspects of the QMS are performing optimally. Deploying a risk-based QMS that conforms with AASHTO, ASTM, and ISO/IEC quality standards is a rigorous task. It is common to feel that the QMS is a burdensome requirement for companies to comply with. However, not having a functioning, structured, risk-based QMS could lead to failure for any lab. A reputation for inconsistent or unreliable results does the very opposite of driving sales, especially in the built environment.


Jayanth Kumar Rayapeddi Kumar, PE, ENV SP, currently serves as the quality control engineer for Jas. W. Glover Ltd. in Hawaii, and on the ASTM D04 committee on Road and Paving Materials and the ASTM E36 committee on Accreditation and Certification. Reach him at jayanthk@gloverltd.com.

Dave Savage is the director of accreditation for CMEC Inc. and serves on ASTM Executive Committees E36, Accreditation and Certification, and D04, Road and Paving Materials. Reach him at davesavage@cmec.org.

Paul Matera currently leads the Inspection Body program for the ANSI National Accreditation Board (ANAB). Before joining the ANAB staff as a senior accreditation manager, he provided assessment services to different accreditation bodies and industry groups. Reach him at pmatera@anab.org.
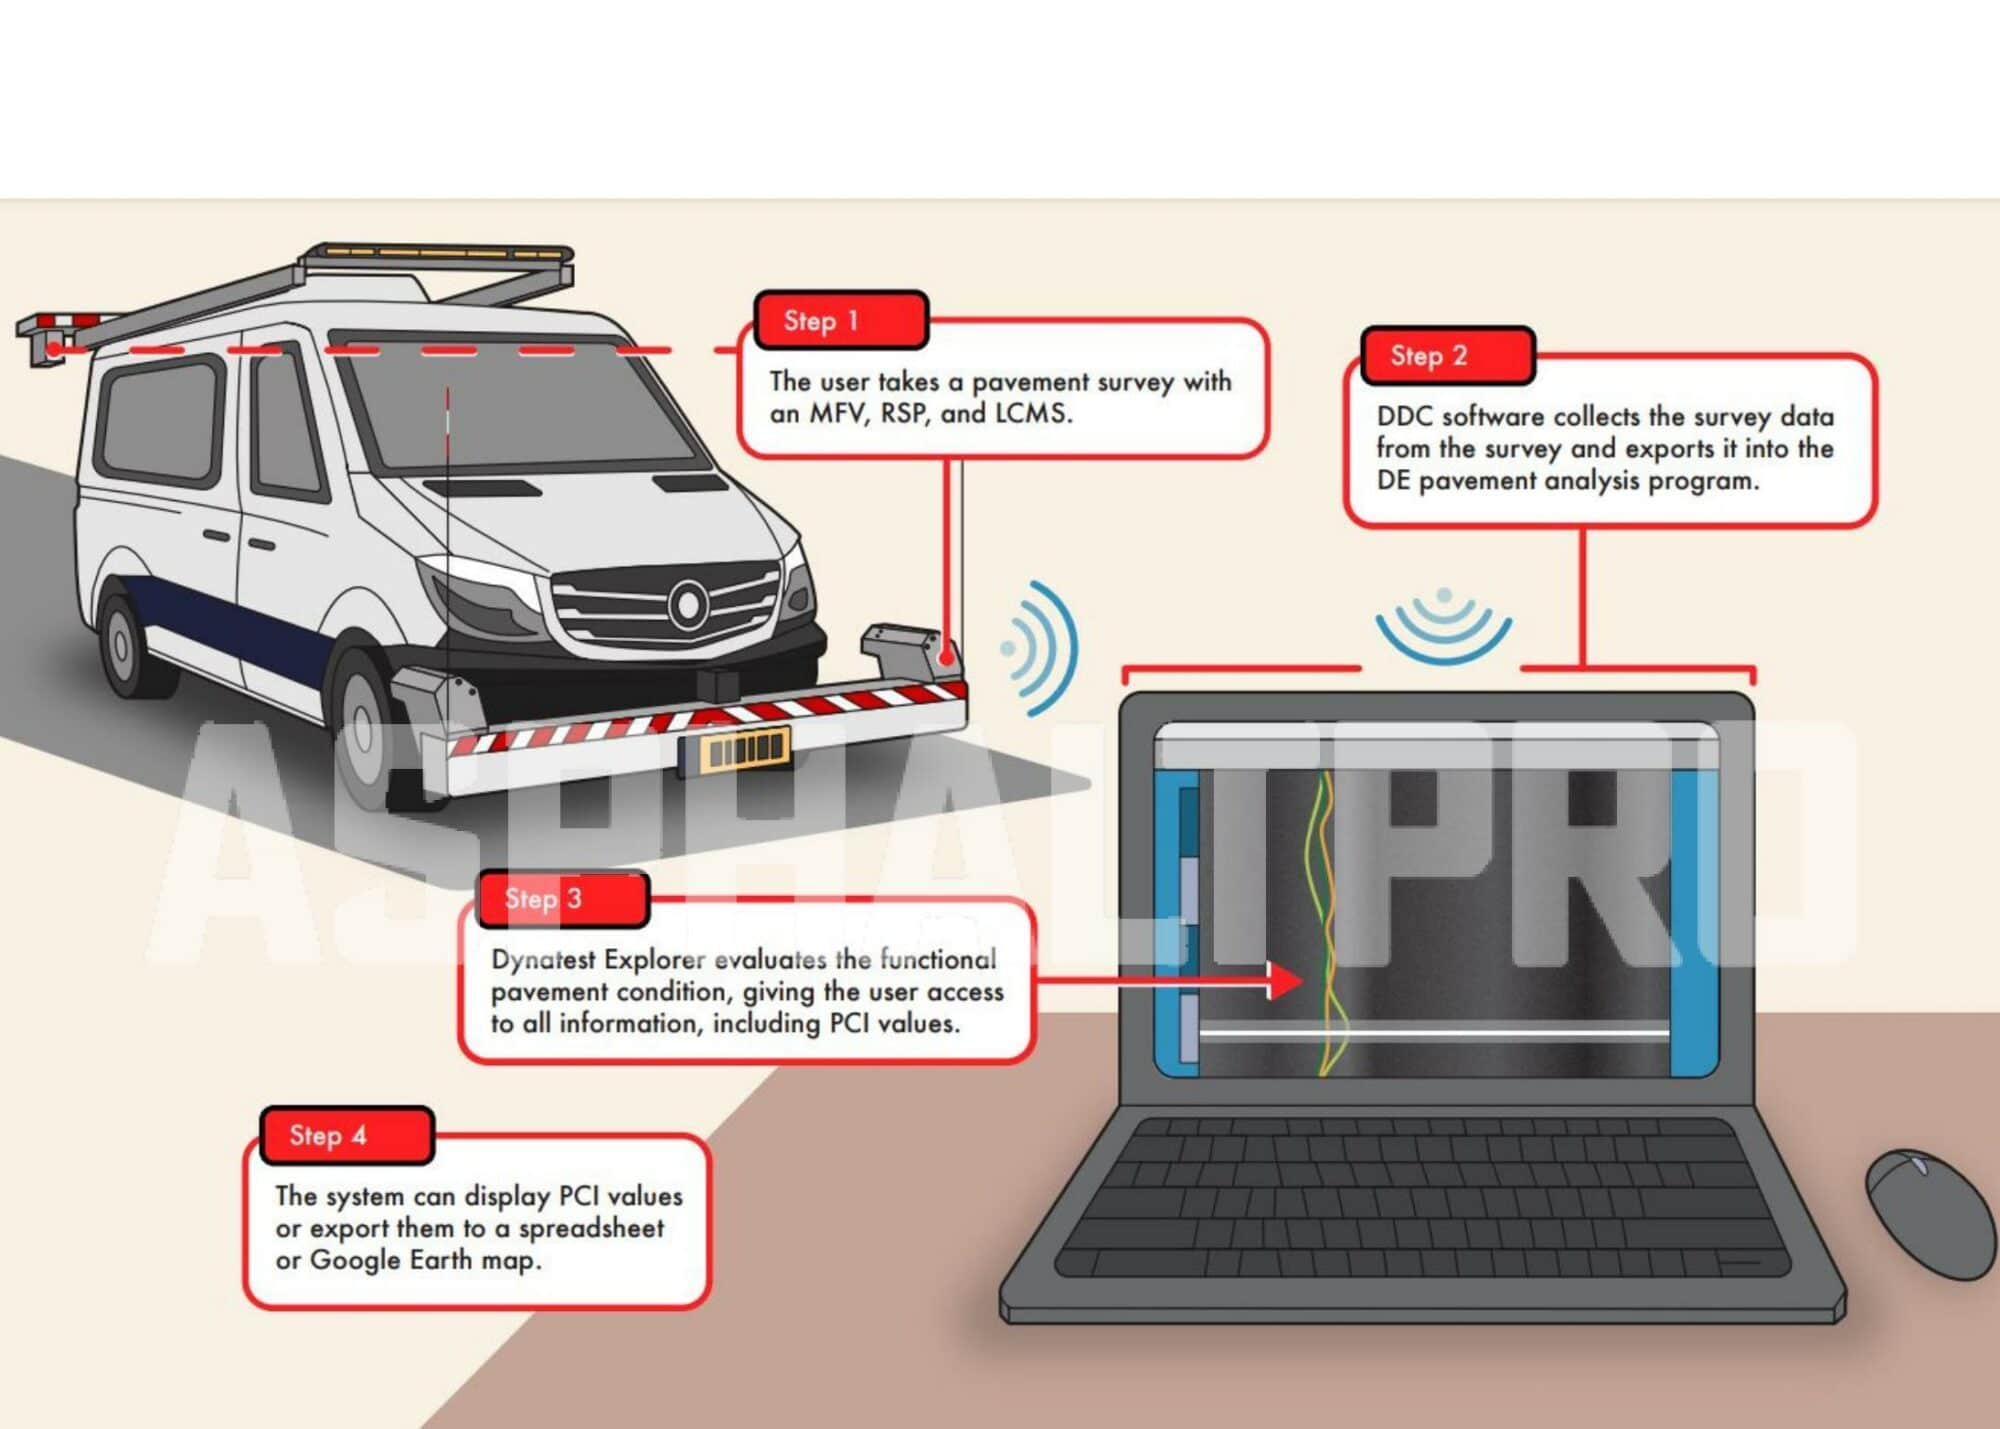

Dynatest’s PCI Calculation Tool

The U.S. Army Corps of Engineers Research Lab developed in 1976 an empirical metric for rating a pavement’s condition taking all types and severities of distresses into consideration. The international standard ASTM D6433-20 (and ASTM D-5340-20 for airports) uses the resulting pavement condition index (PCI) to determine the current condition of a pavement network, but the calculations of the PCI value can be time consuming and difficult to perform.

To do all the PCI calculations based on ASTM D6433-20 and with the functional pavement condition data within the sample unit that a user defines, Dynatest A/S, headquartered in Denmark, has launched its automated PCI calculation function as a licensed module within the Dynatest pavement analysis program, Dynatest Explorer (DE). Here’s how it works:

Because the PCI calculation tool is a module of DE, the user first takes readings of the pavement in question with the Dynatest Multi Functional Vehicle (MFV) equipped with the Road Surface Profiler (RSP) system and Laser Crack Measuring System (LCMS®), which collect pavement data.

Dynatest Data Collection (DDC) software stores and controls the data from the MFV’s survey. The data is displayed while testing or stored for export into the DE program.

The DE program analyzes the data, evaluating the functional pavement condition. DE then gives the user access to all the data, images and distresses acquired during the survey, allowing for visualization, verification, calculation and reviewing of results, which now include the PCI values.

The system can display the PCI values on a table or a graph, export them to Excel, or show them on a map exported to Google Earth.

For more information, contact Dynatest through Oline Westerdahl at owl@dynatest.com.

How P-401 Spec Changes Affect You

Editor’s Note: In the August Hawaii Asphalt Paving Industry (HAPI) newsletter, Jon Young shared a summary of the Airfield Paving Clinic Workshop (APCW) held July 11 and 12 at the Daniel K. Inouye Airport Conference Center. The goal of the workshop was to discuss changes to the Federal Aviation Administration (FAA) Advisory Circular (AC) 150/5370-10H, which is more commonly referred to as the P-401 spec. The article is reprinted with permission and goes over the changes, which were issued Dec. 21, 2018, and discussed at the workshop.

Changes to the P-401 spec have placed more emphasis on two items: quality control (QC) and tack coat.

QC is an essential component of a project. The updated spec makes the QC program, which formerly was an incidental cost, a separate pay item. The QC program includes all required sampling and testing by the contractor, and now also requires the contractor to facilitate a quality control/quality assurance (QC/QA) workshop.

Required participants in the QC/QA workshop are the engineer, resident project representative (RPR), contractor, subcontractors, testing laboratories and owner’s representative. The workshop must be held prior to start of construction.

The other change stresses the importance of tack coat by making it a separate pay item. Tack coat is the “glue” that is applied between two layers of asphalt. Adequate bonding between lifts of asphalt pavement is critical for the completed pavement structure to behave as a single unit and provide adequate strength.

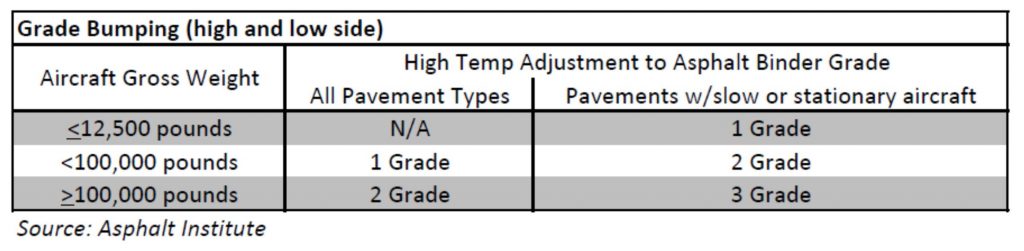
Table 1. Guidance for PG selection includes grade bumping

Other changes to the P-401 spec include the following items.

  1. Compaction of the mat will now be measured as a percent of Total Maximum Density (TMD) versus what it used to be, which was a percent of lab bulk density. This makes it consistent with the highway industry.
  2. The spec now offers improved minimum thickness guidance. The recommended minimum construction lift thickness for Gradation 1, 2 and 3 is 3 inches, 2 inches and 1 ½ inches, respectively. Gradation 3 is intended for leveling courses. If the contractor wishes to use Gradation 3 in other locations, the contractor will need to get FAA approval to do so.
  3. Gradation plans have been adjusted to match the military airfield specifications.
  4. For rut testing/evaluation, there is a new loaded wheel test requirement for mix design. The default uses an Asphalt Pavement Analyzer (APA) with 250 psi hose pressure at 64 degrees centigrade in accordance with AASHTO T340. The rutting must be less than 10 millimeters at 4,000 passes. An alternative method also uses the APA, but at 100 psi hose pressure at 64 degrees centigrade in accordance with AASHTO T340, the rutting must be less than 5 millimeters at 8,000 passes. Another alternative method uses the Hamburg Device in accordance with AASHTO T324 and the rutting must be less than 10 millimeters at 20,000 passes.
  5. Updated guidance on PG selection; there is an additional grade bump (See Table). The base grade is based on climate only; there is no bumping for traffic. When bumping a grade, add a PG Plus test if the upper temperature limit is 92 or greater (if there’s a modified binder). Use Asphalt Institute’s binder spec database for reference.

A handful of the most important slides from additional presentations are available if you click here.


APCW Teaches the Specs

Guy Ischinotsubo, engineering program manager for HDOT—Airport Division, addressed about 65 attendees at the APCW event. Photos courtesy Lynn Young, HAPI

The workshop attracted about 65 people from the Hawaii Department of Transportation—Airports Division, design consultants, construction managers, inspectors and paving contractors. The workshop covered many aspects of asphalt pavements, including significant changes to the P-401 spec that were made in the recently released AC 150/5370-10H.

Day 1 topics included an overview of the workshop, aggregates, asphalt binder, hot-mix asphalt mix design and contractor quality control program. The class exercise was a contractor mix design submittal review.

Guy Ischinotsubo, engineering program manager for HDOT—Airport Division, addressed about 65 attendees at the APCW event. Photos courtesy Lynn Young, HAPI

Day 2 topics included owner acceptance testing and percent within limits; prime coat, milling, and patching; tack coat; paving operations; compaction operations; and longitudinal joints. The class exercise was a pay factor analysis.

Attendees received professional development hours certificates at the end of the workshop.

Lab Friction Testing Gets a New Standard 

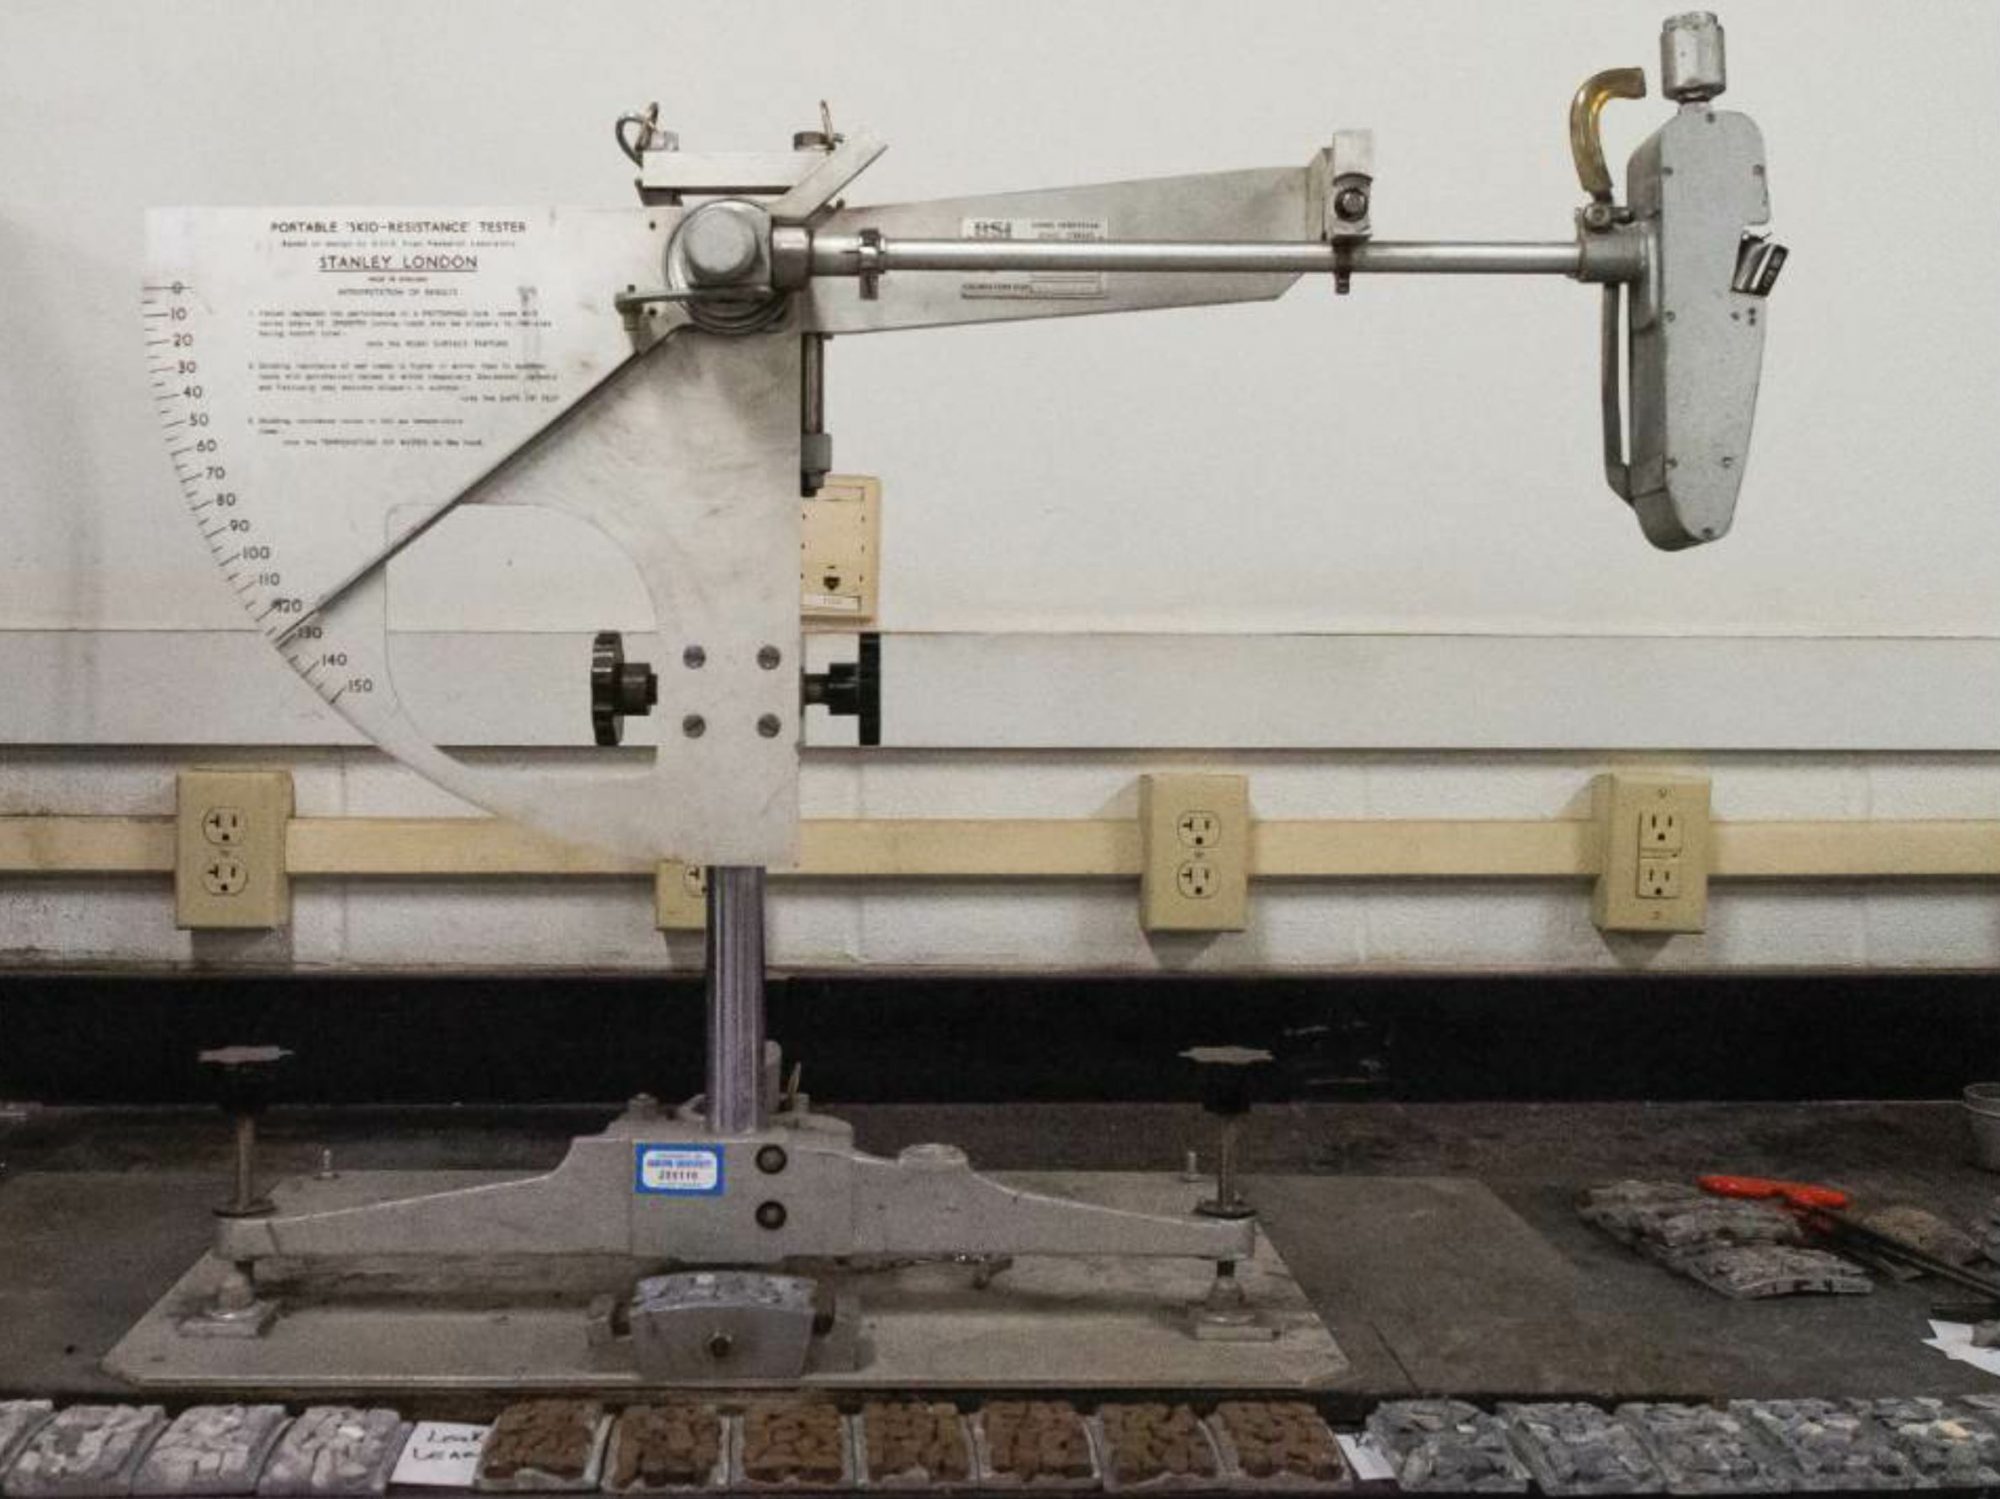
Some highway agencies still rely on the British Pendulum (BP) test to qualify aggregates for asphalt pavement surface friction. Other agencies specify friction aggregate based on geology and/or mineralogy. Both approaches have allowed agencies to maintain an acceptable level of pavement friction long-term performance. However, the BP polishing and testing procedure evaluates a single size coarse aggregate and requires careful manual adjustment of the pendulum height to obtain the correct length of surface contact. Recent advances in laboratory polishing and friction testing now provide a better assessment of friction that considers the entire gradation in an asphalt mixture rather than a single aggregate source.

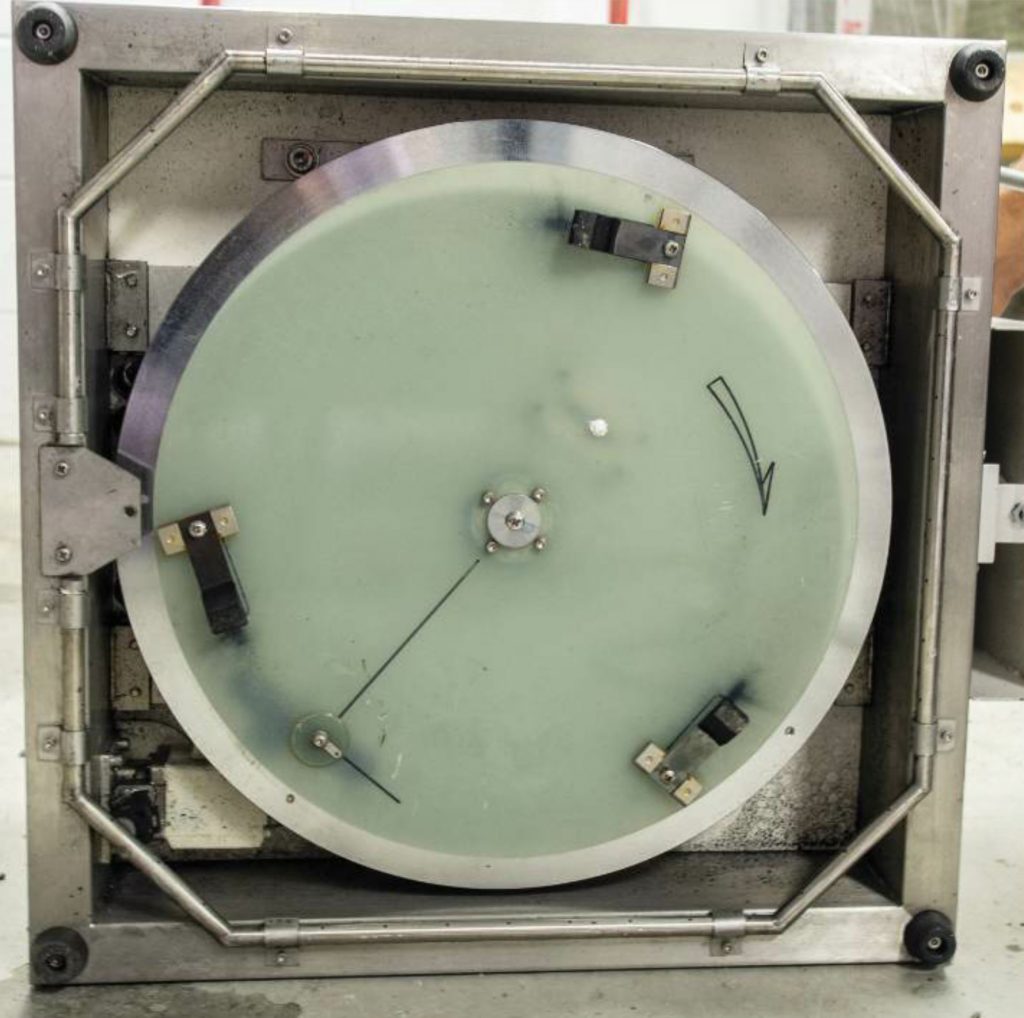
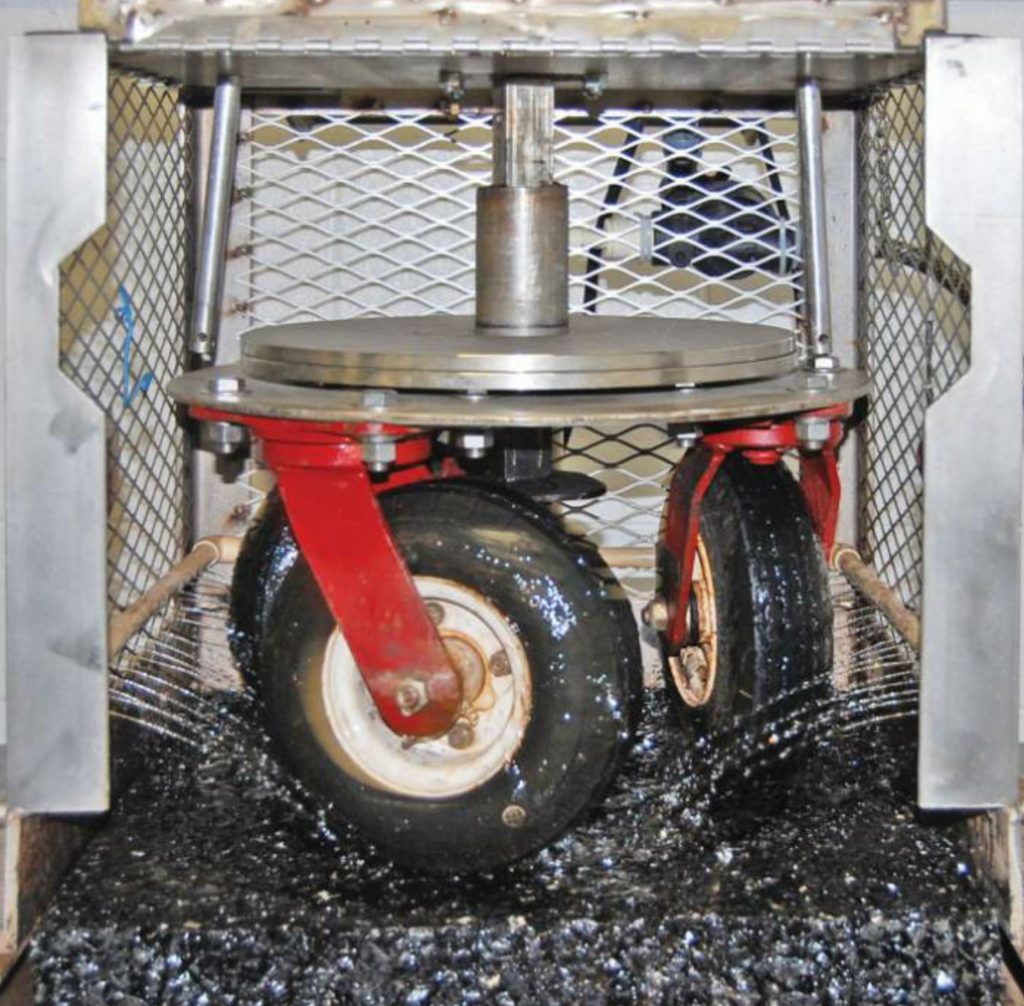
The dynamic friction tester (DFT) gives a better assessment of the friction of a pavement surface. The DFT procedure, standardized in ASTM E1911, provides a more consistent measurement (no manual adjustment of the device before testing) and records friction over a range of speeds. The National Center for Asphalt Technology (NCAT) developed the Three Wheel Polishing Device (TWPD) in 2006 to complement the DFT for measuring friction on asphalt mixes.

British Pendulum (BP) test

The Maryland State Highway Administration modified the TWPD concept to use a large ring of a single aggregate on an epoxy substrate. After polishing with the TWPD, the ring of aggregate can be tested with the DFT to assess the aggregate’s terminal friction value. Under Maryland’s lead, a task group of American Association of State Highway Transportation Officials (AASHTO) agency representatives and NCAT researchers are developing a new standard test procedure using the TWPD and DFT. This standard will provide equipment requirements and testing procedures to rapidly evaluate an aggregate source or asphalt surface mix for long-term friction performance.

In addition to the TWPD and DFT, the equipment includes an aggregate specimen preparation device consisting of a rigid mold for the single aggregate procedure. The mix specimen preparation procedure will permit any slab compaction procedure that produces the required size with a smooth surface compacted to a uniform target density. The testing procedure for aggregate polishing and asphalt mix polishing are slightly different but involve the same TWPD. Both procedures use the DFT for measuring friction.

NCAT developed the Three Wheel Polishing Device (TWPD) in 2006 to complement the DFT for measuring friction on asphalt mixes.

This new friction testing protocol allows an agency or aggregate supplier to determine the long term (terminal) friction properties of any aggregate or asphalt mix in about one week for a cost of less than $5,000. A few agencies have used this system to assess the friction performance of aggregate blends for surface mixes at a substantially lower cost and much shorter time period compared to full-scale field test sections with no risk to the traveling public. <endmark>

For more information or a quote from the testing lab, contact NCAT at (334) 844-7328.

Michael Heitzman is the assistant director, senior research engineer for NCAT. His specializations include pavement friction, non-destructive pavement evaluation, thin lift surfaces, rehabilitation and more. This article is reprinted from the Spring NCAT Newsletter with permission.

Understand the Job Mix Formula

Hawaii Asphalt Pavement Association Executive Director John Young explains components of a job mix formula for dense-graded mixes–a must read introduction to JMFs.

The objectives of paving with an asphalt mix are to get a smooth, quiet ride with good strength, stability, and durability; with no rutting, shoving, or flushing; and with no cracking or raveling. We achieve these objectives by manipulating the asphalt binder and the aggregate, and the ratio between them, via the mix design. City/county, state and federal letting agencies want to be sure the mix you place will meet their specifications before you start producing tons of it.

Consider this direct quote from specifications in a Hawaiian city:

“The contractor shall submit for approval, a job-mix formula for each asphalt concrete mixture to be supplied for the project. The job-mix formula for each mixture shall establish a single percentage of aggregate passing each required sieve size and a single percentage of bituminous material to be added to the aggregate.”

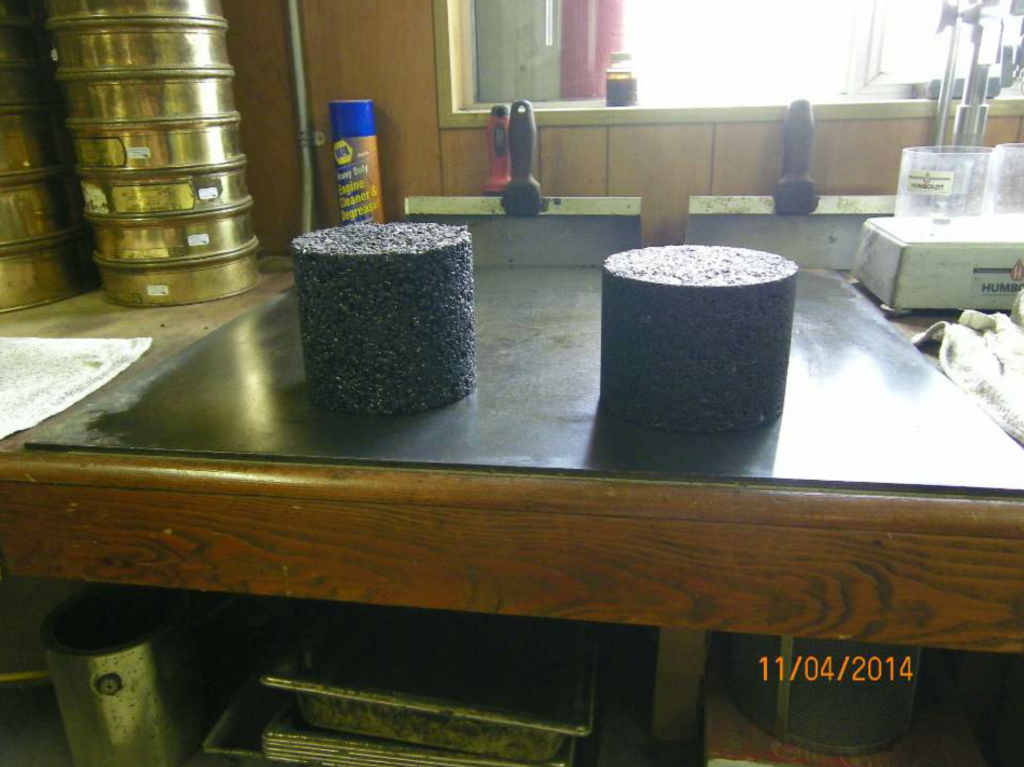
Here you see HMA mix specimens, with OGFC specimens on the left and dense-graded mix specimens on the right.

Here you see HMA mix specimens, with OGFC specimens on the left and dense-graded mix specimens on the right.

The job mix formula (JMF) submittal is the mechanism to confirm that the mix being produced is in accordance with the project specifications.

We’ll first define three types of mix designs.

Dense-graded mixes are the most common. They incorporate well-graded aggregate and 5 to 6 percent asphalt binder (by weight of mix). They are designed to be impermeable, which means they minimize water getting to the layer below them.

Gap-graded mixes, such as stone matrix asphalt (SMA), provide an excellent surface course. They incorporate gap-graded aggregate, 6 to 7 percent asphalt binder (by weight of mix), and are designed to be impermeable.

Case Study: the Plant Permitting Process

Open-graded mixes offer good wearing, base or intermediate courses. They incorporate crush stone or gravel and anywhere from 5 to 10 percent asphalt binder (by weight of mix). These mixes are designed to be permeable, which means they allow water to flow through them. You’ll hear them referred to as porous asphalt and open-graded friction courses, which offer the safety features of reduced back spray and reduced hydroplaning during wet driving conditions.

This article will discuss the components of a JMF for dense-graded mixes. Let’s start with a discussion of the asphalt binder, the aggregates, and the ratio between the two.

First consider the binder

Asphalt binder is the liquid asphalt cement (AC) added to the mix. The main purpose of the binder is to completely coat the surface area of the aggregate. This will waterproof the aggregate.

It is critical to use the optimum AC content in the mixes. Too little AC in the mix can leave portions of the aggregate uncoated. This results in a lack of durability and strength, and can lead to raveling or stripping. Too much AC in the mix results in a needlessly expensive mix, rich spots or bleeding, lowered skid resistance, and rutting or shoving of the pavement. In other words, the performance of the pavement depends on how much asphalt binder is in the mix.

  • Mix design methods are generally distinguished by the way in which they determine the optimum asphalt binder content. The general process can be subdivided into:
  • Make several trial mixes with different asphalt binder contents.
  • Compact these trial mixes in the lab. This compaction is meant to be a rough simulation of field conditions.
  • Run lab tests to determine key sample characteristics.
  • Pick the asphalt binder content that best satisfies the mix design objectives.

Once the optimum asphalt binder content has been determined, the voids in mineral aggregate (VMA) needs to be checked. The owner/agency specifications will indicate the required minimum VMA for your project. VMA is the intergranular space occupied by asphalt and air in a compacted asphalt mixture. In a component diagram, it is the sum of the volume of air and the volume of effective asphalt.

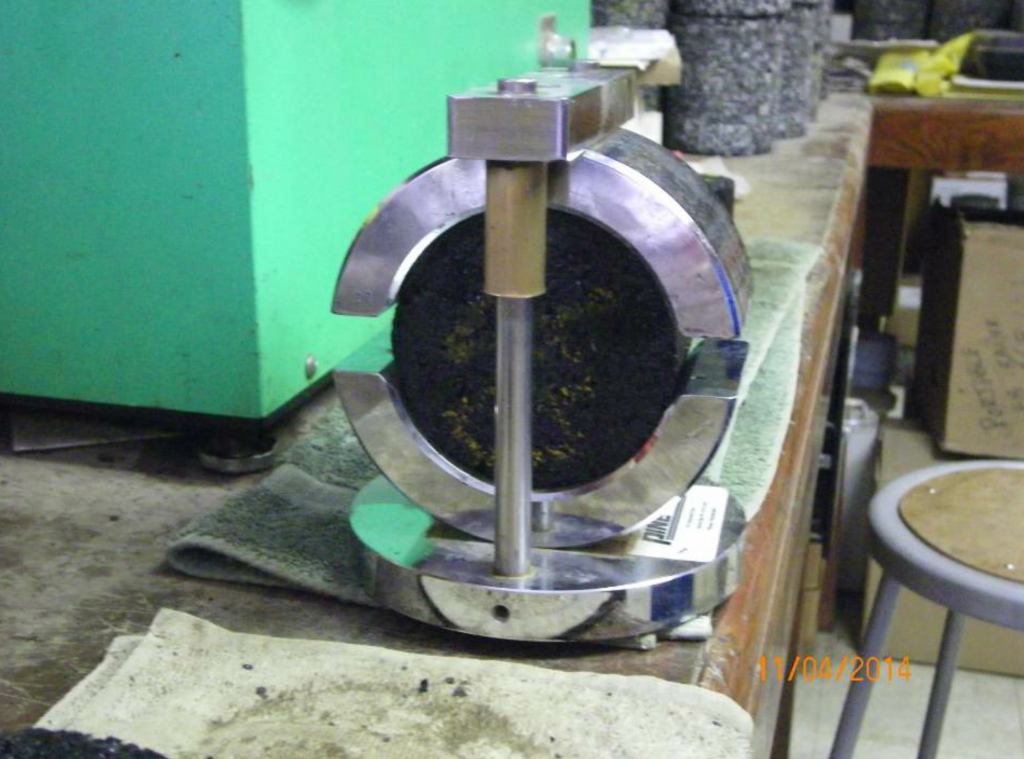
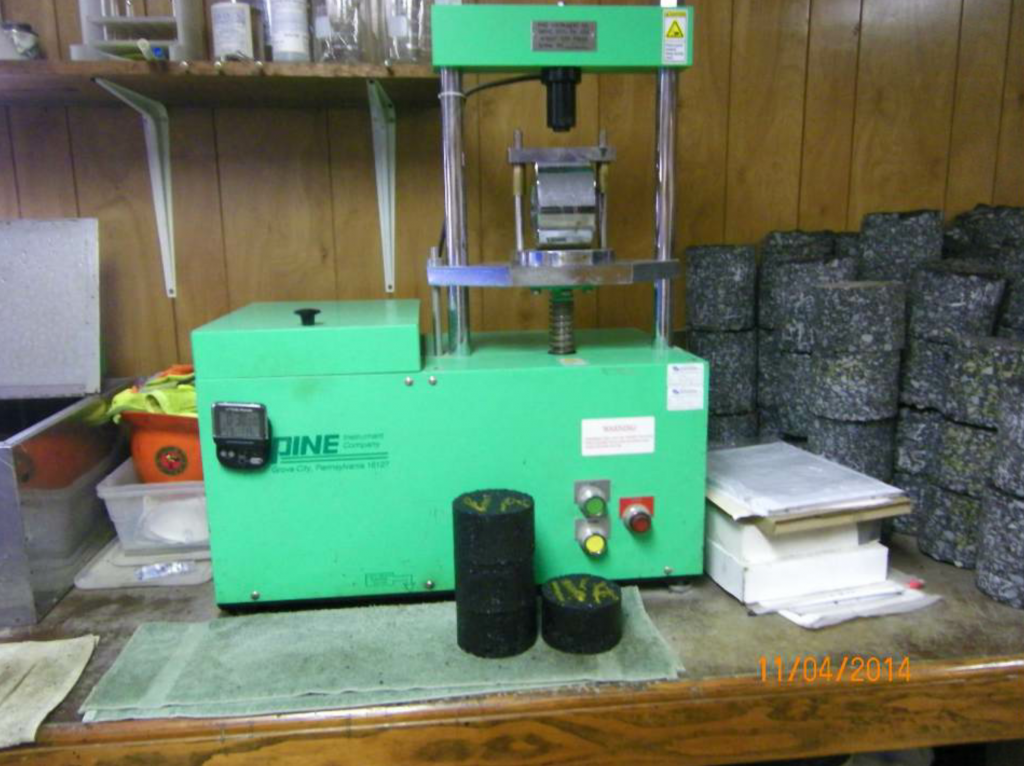
This is the Pine Test Equipment automated 4-inch and 6-inch Marshall Stability & Flow press with recorder. Also pictured is a 4-inch Marshall Stability & Flow compression (breaking) head with a Marshall specimen.

This is the Pine Test Equipment automated 4-inch and 6-inch Marshall Stability & Flow press with recorder. Also pictured is a 4-inch Marshall Stability & Flow compression (breaking) head with a Marshall specimen.

When viewed as an equation, Vbe is effective binder and Va is air. The design Va is typically 4 percent, but the Vbe will vary depending on the size of the aggregate. The aggregates used in finer mixes have more surface are than the larger aggregates used in coarser mixes; therefore, the finer the mix, the higher the VMA requirement. The owner/agency specifications will indicate the required minimum VMA for your project.

We also measure the voids filled with asphalt (VFA). This is the percent of VMA that is filled with AC. If the voids that are full of AC are too few, the pavement won’t hold up. In other words, if the VFA is too low, that’s an indication that there isn’t enough asphalt to provide durability.

Meeting both the VMA and VFA is critical to the success of a job mix.

Now consider the aggregates

The specification will have a gradation requirement for the mix. The requirements are established to provide the proper proportion of different aggregate sizes that will allow the aggregates to make an excellent interlocking structure. Not only do the aggregates have to meet a specified gradation, they must also meet consensus aggregate properties and source aggregate properties.

This is the Pine Test Equipment automated 4-inch and 6-inch Marshall Stability & Flow press with recorder. Also pictured is a 4-inch Marshall Stability & Flow compression (breaking) head with a Marshall specimen.

This is the Pine Test Equipment automated 4-inch and 6-inch Marshall Stability & Flow press with recorder. Also pictured is a 4-inch Marshall Stability & Flow compression (breaking) head with a Marshall specimen.

Consensus aggregate properties include the coarse aggregate angularity, the fine aggregate angularity, the flat and elongated particles and the clay content.

The source aggregate properties include the toughness and soundness, which both serve a purpose. The deleterious materials found in the source also matter.

Another consideration is the moisture sensitivity of the mix, which affects its propensity for stripping. If the propensity for stripping is high, an anti-stripping agent will need to be added during the mixing process.

This Barnsted-Thermolyne 18-cubic-foot drying and heating oven has several samples and specimens of mix being heated and aged for testing.

This Barnsted-Thermolyne 18-cubic-foot drying and heating oven has several samples and specimens of mix being heated and aged for testing.

Lastly, when preparing the JMF submittal, you will determine the unit weight of the mix. This is important for production and the contractor will use this to determine yield when paving.

As mentioned above, the specifications tell you what to submit. Each owner/agency has rules and requirements you have to adhere to. When you have the JMF submittal ready, double-check it to make sure it’s complete and to make sure it complies with the agency’s specification. You can get more information from the Asphalt Institute’s MS-2 Asphalt Mix Design Methods, 7th edition book. The manual is considered the basis for mix design. Above all else, make sure you have followed your agency’s spec.

How to Micro Surface

Micro surfacing is a polymer-modified, cold-application paving process. It relies on specialized equipment to combine polymer-modified asphalt emulsion, mineral aggregate, water and additives, and uniformly spread this mixture over a properly prepared surface.

The asphalt emulsion breaks onto the pavement surface. Then, when the mixture cures by loss of water, it will be bonded to the existing pavement to create a long-lasting wearing surface.

You may be more familiar with the process’s parent product, slurry seal. However, the use of polymer-modified asphalt emulsion in micro surfacing (versus standard asphalt emulsion in slurry seal) allows for the surface to set in less than an hour.

According to Pat Denney, Micro Surfacing Manager for Road Science, Tulsa, Oklahoma, slurry seal emulsions can be produced with a cationic quick-set emulsifier (CQS), a cationic slow-set emulsifier (CSS), or an anionic slow-set emulsifier (SS). CSS and SS emulsifiers depend largely on evaporation for curing, making them much slower to cure.

“By contrast, a micro surfacing CQS emulsifier will have a chemical break that begins to kick water out of the system,” Denney said. “Basically the system is stabilized during mixing, and then destabilized chemically to trigger a quicker curing process.”

Although it may take up to four hours or longer for a slurry seal to cure enough to open for traffic, micro surfacing is designed to allow straight rolling traffic within one hour of paving.

In addition to a faster curing time, the added durability that a polymer-modified emulsion offers makes micro surfacing an attractive option for busier roads.

“Micro surfacing has a broader range of applications including interstates and state highways where slurry seal cannot and should not be used,” Denney said. Slurry seal emulsions can be made with or without polymer, but micro surfacing emulsions always have a minimum of 3 percent polymer by weight of asphalt according to specification.

It’s important to note that, despite its benefits, micro surfacing has no effect on the structural capacity of the existing pavement. As such, micro surfacing should only be used to extend a roadway’s service life, not in the hopes of repairing structural damage.

“The road that’s ideal for micro surfacing doesn’t need to be in perfect condition,” said Jimmy Kendrick, Director of Sales at Bergkamp Inc., Salina, Kansas, “but it should be in fairly good condition.”

Minor distress can include some cracking, oxidation, raveling and rutting.

Before placing the micro surface, Kendrick said it’s important to repair any damage on the roadway. Cracks must be sealed and all patches should be made.

One pavement distress that may not need to be repaired prior to micro surfacing is rutting up to 1 ½ inches deep.

Applying a micro surface can also improve skid resistance and surface permeability. Other benefits of micro surfacing include no loss of curb reveal, no transitions at intersections and driveways, and no alteration of drainage.

Whether micro surfacing is done as a single or double lift, adjustments to manholes, inlets and the like are not necessary.

“Another benefit of micro surfacing is that it can be used alongside other applications,” Kendrick said. For example, it can be used alongside a cape seal, where a chip seal is covered with a slurry seal or micro surface.

A micro surfacing treatment can last up to 7 years. Over the next few pages, we’ll outline the best practices of micro surfacing so your treatment looks good and lasts long.

Micro Surfacing Weather

Although the required ambient temperatures change from state to state, Kendrick said most states require temperatures of 50 degrees and rising and no chance of freezing temperatures within 48 hours of application.

Even at the correct ambient conditions, the humidity, cloud cover or even shade on the roadway can affect the curing of the micro surface.

“Emulsion formulation is very important and will change over time as the season changes from spring to summer and then to fall,” Denney said.

Meet Micro Surface Specs

Denney said that most, if not all, agency design specifications for micro surfacing are based on ISSA A143 Recommended Performance Guidelines for Micro Surfacing.

Although the inspection requirements for micro surfacing vary from agency to agency, Denney said all agencies require quality control on the aggregate being delivered to the stockpile site.

“This may be accomplished, for example, by sampling and testing aggregate for gradation and sand equivalency on every 200 tons of aggregate delivered,” Denney said. “If each sample passes the tests and is within the stockpile tolerances of the design, then the aggregate can be used and placed in the larger stockpile of passing material.”

The materials for micro surface are mixed in a very specific process, in measurements based on the mix specification, within the pugmill, seen here.

The materials for micro surface are mixed in a very specific process, in measurements based on the mix specification, within the pugmill, seen here.

The contractor must also provide emulsion test results from their producer showing that the emulsion passes specification, Denney added. “Some or most agencies require that the emulsion producer provide a sample of emulsion to the agency for testing,” he said.

The agency must also ensure that what is supposed to be laid in pounds per square yard by weight of mix or by weight of dry aggregate is what they are actually getting. This can be accomplished by requiring contractors to provide load weight tickets for aggregate delivered to the roadway.

Micro Surface Materials Handling

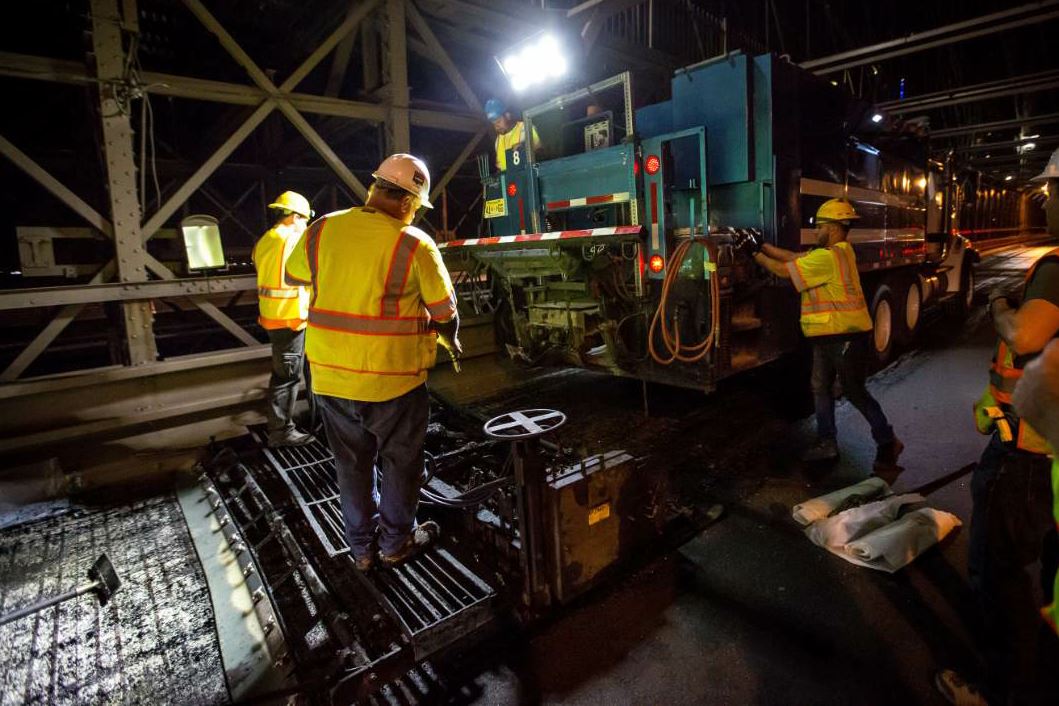
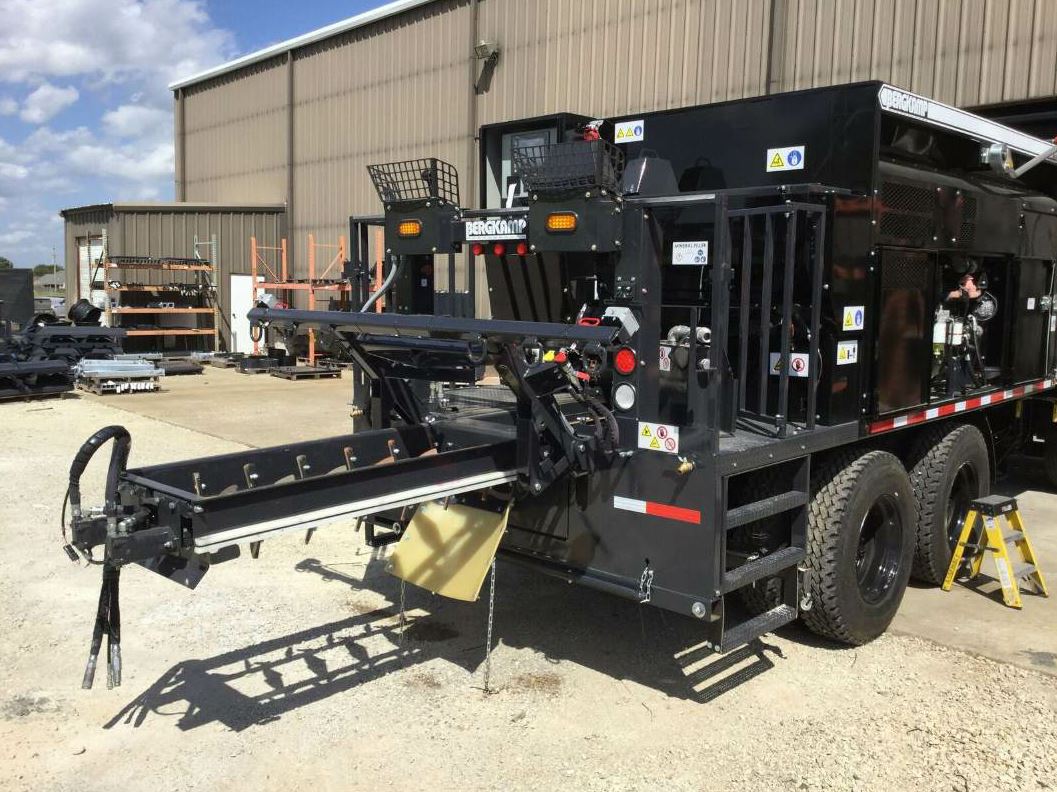
Micro surfacing mixture is made and applied on the job site with a specialized machine. The machine combines the materials, which include mineral aggregate, polymer-modified asphalt emulsion, water and additives, based on the project’s specifications.

These materials should be stored as near to the job site as possible.

At the stockpile staging area, it’s important that the delivery site for the aggregate is flat and free of vegetation. Denney recommends a gravel, cement, or asphalt surface.

Regardless of the underlying material, loader operators should take care to avoid contaminating the aggregate with dirt, vegetation or any other contaminant. It’s also important to ensure the screening deck is free of contaminants and is in good working order.

It’s also important that the delivery transports, transfer tanks, and tanks on the project that will be used for the emulsion are also free of contamination, and that the screens on equipment are cleaned daily.

Micro surface also requires a reliable source of potable water.

“Water can have some effect on mixture characteristics,” Denney said. “The use of pond water in a micro surfacing application is not recommended due to increased risk of the presence of deleterious materials or other types of contamination that could negatively affect mixing and cure rates.”

Additives may include both wet and dry additives. The storage area for these additives should be clean and dry additives should be covered by a tarp to protect them from moisture. It’s also important to ensure that the tanks, drum barrels or totes are contaminant-free.

The additives may include control additives–typically a wet additive–that is used to control mix time without sacrificing cure rate, Denney said. “The control additive allows the paving crew to determine the mix and cure rates of the mixture.”

This is typically a solution with a small percentage of emulsifier used in the production of the emulsion. “However, in the Western United States,” Denney added, “aluminum sulfate is used extensively because of the high reactivity of the aggregates in that region.”

Additives may also include portland cement or hydrated lime to stabilize the mixture during the mixing phase.

It’s important to ensure there are enough materials at the stockpile site and enough mobile support units to transport it to the job site to constantly supply the micro surface machine with material. This both maximizes production and minimizes transverse joints.

“Having enough mobile support units will affect your production rate and are part of the continuous paving process,” Kendrick said. Typical jobs covering 6 to 8 miles per day require between four and six mobile support units, he added.

Denney added that it’s also important to conduct occasional checks for stockpile moisture content.

“Every component of the mixture is based on dry aggregate weight,” Denney said. Checking aggregate moisture is integral to ensure delivery of the appropriate amount of mineral filler, water, control additive and emulsion for the mix used on the job. “Any major variation in moisture will significantly impact proper mix quantities of individual ingredients.”

The stockpile area may also serve as the best location to place test strips to ensure appropriate mix and cure rates.

How to Micro Surface

In addition to a faster curing time, the added durability that a polymer-modified emulsion offers makes micro surfacing an attractive option for busier roads.

In addition to a faster curing time, the added durability that a polymer-modified emulsion offers makes micro surfacing an attractive option for busier roads.

As with any pavement preservation method, the surface of the job should be clean and dry.

You will also need to grind up any thermoplastic striping within the area to be micro surfaced and cover all castings, such as manholes and inlets. You should also place a damp-proof membrane at the beginning and end of the application area to ensure the straight lines.

When the surface is ready, it’s time to tack.

As mentioned earlier, micro surfacing mixture is made and applied on the job site with a specialized machine.

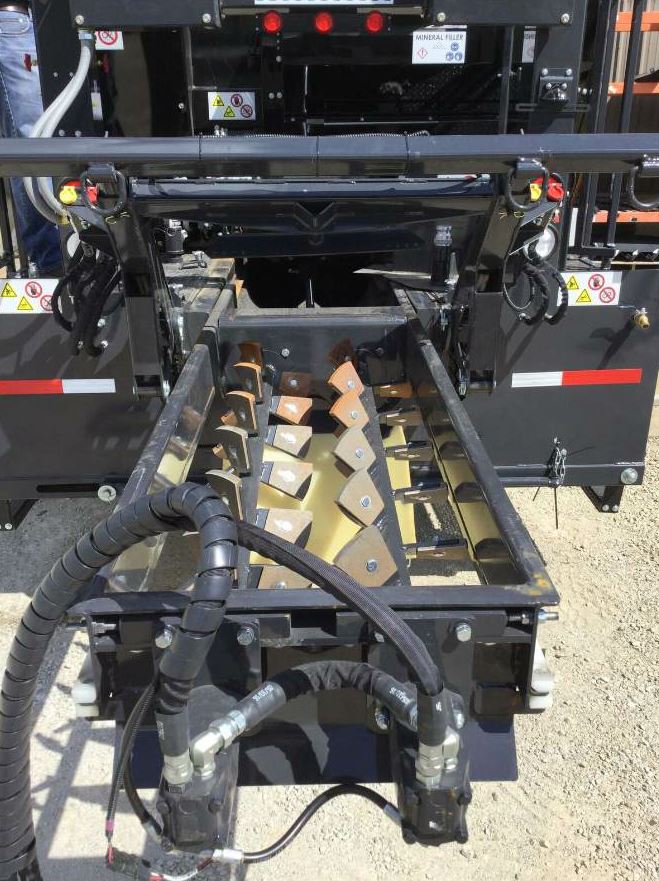
The materials are mixed in a very specific process, in measurements based on the mix specification, within the pugmill. The composite material is then fed into a spreader box to spread it over the full width of the traffic lane in a single pass, often ⅜ of an inch thick.

Micro surfacing can be laid at a thickness of two to three times the size of the largest stone in the mix.

A double lift may be required for a more robust wearing surface, on roads with higher traffic counts, or where rut filling or leveling is employed. It’s recommended to wait a minimum of one day between placing the first lift and the second lift, but the exact waiting period required will depend on the agency and the traveling speed on that roadway.

“Micro surfacing is looked at in pounds [of aggregate] per square yard [of material],” Kendrick said. “So if you’re trying to achieve a higher level of pounds per square yard, you’ll need to do multiple lifts.” He said two lifts may also be required on roads that have a bit more cracking.

If there are deeper ruts to be filled, the crew may make one pass with a rut box attached to their micro surfacing machine. The box is designed in such a way that it augers material right into the rut so it’s not spread out over the width of the lane, Kendrick said. “And then it has a rear strike off to make it level.” Then, the crew applies micro surface to the entire pavement on the second pass.

Whether applied in one lift or two, it’s important that the meet lines are made at the center of the road, the center of a lane, or the edge of a lane, but never in the wheel path. The meet line should overlap no more than 3 inches, maximum.

The micro surfacing machine should also travel in a straight path to maintain the longitudinal joint and to ensure edge lines along shoulders, intersections, driveways and curbs are straight. Denney also recommends maintaining a consistent speed of operation to avoid outrunning support vehicles.

As the micro surfacing machine travels along, the crew may need to perform some hand work around driveways and intersections, as well as smooth out any rough spots of larger aggregate that may make it through the screener to the pavement.

“[Handwork] is where the most talented of the crew is needed,” Denney said. “A good squeegee person can make a good job look great and an inexperienced squeegee person can make a good job look poor.”

The new surface may initially appear dark brown, but will be black after it cures.

It’s also important to keep traffic off of the newly micro surfaced pavement until it cures. Turning traffic may need to be kept off the surface even longer.

Maintain Micro Surfacing Machinery

The materials for micro surface are mixed in a very specific process, in measurements based on the mix specification, within the pugmill, seen here.

The materials for micro surface are mixed in a very specific process, in measurements based on the mix specification, within the pugmill, seen here.

Properly maintaining equipment is also key to ensuring a high quality mat.

Both Denney and Kendrick recommend cleaning the spreader box every time the machine is stopped.

The primary and secondary strike-offs should also be cleaned of “any dried, broken material to ensure a consistent cosmetic appearance of the mat”, Denney said, adding that it may be necessary to stop specifically to clean the box and strike-offs if they are leaving drag marks in the mat.

Denney also recommends allotting enough time at the end of the day for maintenance and clean up, and that the foreman or superintendent inspect the equipment before wrapping up for the day.

Troubleshoot Common Micro Surfacing Issues

Denney said the most common mistakes when it comes to micro surfacing include lack of attention to detail, lack of understanding the differences between micro surfacing and slurry seal, and a lack of proper training.

He added that the International Slurry Surfacing Association, or ISSA, offers a four-day training workshop every January and that the Pavement Preservation and Recycling Alliance (PPRA) is also a helpful resource for information and online training.

“However,” Denney added, “the biggest mistake anyone can make is thinking that we know it all. Staying humble and always asking ‘why’ is crucial.”

“It’s easy to think micro surfacing is like hot-mix paving, but that’s simply not the case,” Kendrick said. “There are a lot of factors affecting the material and the chemistry, and the crew needs to be fully aware of that.”

He recommends establishing a good relationship with an emulsion supplier early on to help guide contractors new to micro surfacing through the process.